---
title: How to Deploy Google VLAs with the PMax Playbook.
description: Deploy a Google Performance Max campaign in BuyerBridge with the PMax VLA playbook. Set budget, product set, and location to serve Vehicle Listing Ads from the feed.
---
[Skip to content](https://support.buyerbridge.com/knowledge/how-to-deploy-a-google-performance-max-campaign#main-content)
English
Show submenu for translations
[Submit a ticket](https://support.buyerbridge.com/knowledge/kb-tickets/new?hsLang=en)
![BuyerBridge\_LOGO-dark-2.png\]](https://support.buyerbridge.com/hs-fs/hubfs/BuyerBridge_LOGO-dark-2.png?height=40&name=BuyerBridge_LOGO-dark-2.png)
Open main navigation
Close main navigation
- English
Show submenu for translations
- [Submit a ticket](https://support.buyerbridge.com/knowledge/kb-tickets/new)
- Go to buyerbridge.com
Go to buyerbridge.com
Welcome to the BuyerBridge Help Center!
- There are no suggestions because the search field is empty.
1. [Help Center](https://support.buyerbridge.com/knowledge?hsLang=en)
2. [Platform Tools](https://support.buyerbridge.com/knowledge/platform-tools?hsLang=en)
3. [Playbooks](https://support.buyerbridge.com/knowledge/platform-tools?hsLang=en#playbooks)
# How to Deploy Google VLAs with the PMax Playbook.
## Deploy the PMax VLA playbook to serve a client's Vehicle Listing Ads from their inventory feed.
For automotive, Performance Max is how Vehicle Listing Ads (VLAs) are delivered. VLA is the ad format, while PMax is the campaign type that serves it. This guide walks you through deploying the PMax VLA Playbook. For the big picture on Google in BuyerBridge, start with the [Google Tools 101 hub](https://support.buyerbridge.com/knowledge/google-tools-101-starting-guide?hsLang=en).
**💡 Note:** The PMax VLA playbook is feed-driven and serves your inventory listings dynamically. Additional PMax playbooks for specific model lines are planned for the future.
**Quick Links**
- [Before You Get Started](https://support.buyerbridge.com/knowledge/how-to-deploy-a-google-performance-max-campaign#before)
- [Step 1: Open the Playbook and Start Deployment](https://support.buyerbridge.com/knowledge/how-to-deploy-a-google-performance-max-campaign#deploy)
- [Step 2: Set the Budget](https://support.buyerbridge.com/knowledge/how-to-deploy-a-google-performance-max-campaign#budget)
- [Step 3: Name the Campaign](https://support.buyerbridge.com/knowledge/how-to-deploy-a-google-performance-max-campaign#name)
- [Step 4: Set the Destination URL](https://support.buyerbridge.com/knowledge/how-to-deploy-a-google-performance-max-campaign#url)
- [Step 5: Choose the Product Set](https://support.buyerbridge.com/knowledge/how-to-deploy-a-google-performance-max-campaign#productset)
- [Step 6: Set Location Targeting](https://support.buyerbridge.com/knowledge/how-to-deploy-a-google-performance-max-campaign#location)
- [Step 7: Review Search Themes and Audiences](https://support.buyerbridge.com/knowledge/how-to-deploy-a-google-performance-max-campaign#themes)
- [Step 8: Review and Deploy](https://support.buyerbridge.com/knowledge/how-to-deploy-a-google-performance-max-campaign#review)
- [What Happens After You Deploy](https://support.buyerbridge.com/knowledge/how-to-deploy-a-google-performance-max-campaign#after)
---
### 🚧 **Before You Get Started**
PMax runs on inventory, so a few things must be in place first:
- The client's **Google channel is onboarded**, with Google Ads and Merchant Center connected. See [How to Onboard a Client's Google Channel](https://support.buyerbridge.com/knowledge/how-to-onboard-a-clients-google-channel?hsLang=en).
- The client's **vehicle feed is approved in Merchant Center**. PMax will not serve inventory until the feed is approved.
- A **square business logo is on the account**. Google requires a logo to run ads, so a PMax campaign will not deploy without one. Logos are set during onboarding.
**‼️ The Merchant Center gate:** If the feed is not approved yet, the campaign deploys paused and shows an awaiting-approval status. Do not turn it live until inventory is approved.
---
### **Step 1: Open the Playbook and Start Deployment**
1. Go to the **Google** channel for the client.
2. Select the **PMax VLA Playbook**.
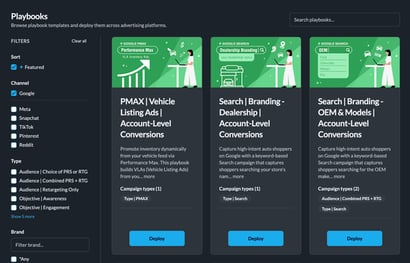
3. Click **Deploy**, then select **Google** as the platform.
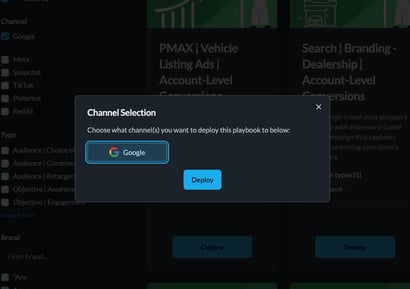
You will move through the deployment as a set of steps shown on the left.
---
### **Step 2: Set the Budget**
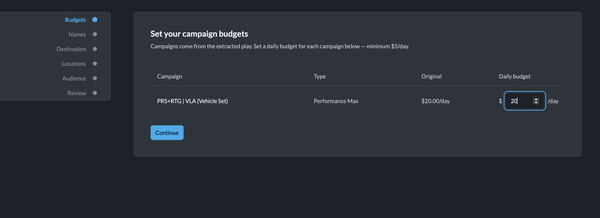
Enter a daily budget for the campaign. Keep it high enough to clear Google's learning phase, since very low daily budgets starve a PMax campaign of the data it needs to optimize.
---
### **Step 3: Name the Campaign**
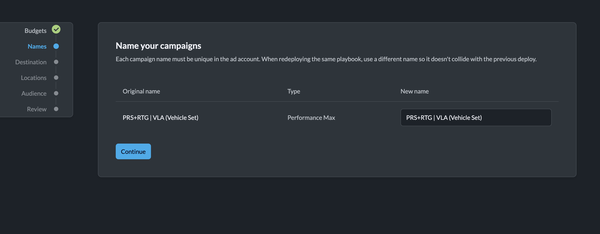
BuyerBridge fills in a default name. Change it if you want it to read a certain way in the client's account.
---
### **Step 4: Set the Destination URL**
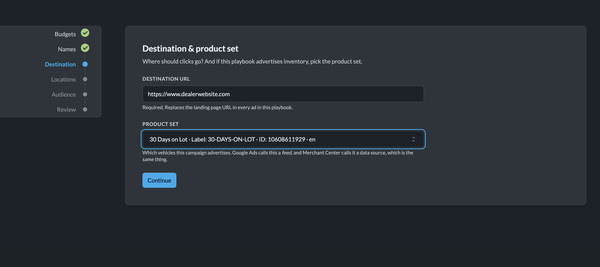
Enter the URL where you want traffic to land. For an inventory campaign, this is usually the dealer's inventory search page.
---
### **Step 5: Choose the Product Set**
The product set controls which vehicles from the feed this campaign serves. Select the product set you want, for example all inventory, or a narrower set. This is what points the VLAs at the right cars.

---
### **Step 6: Set Location Targeting**
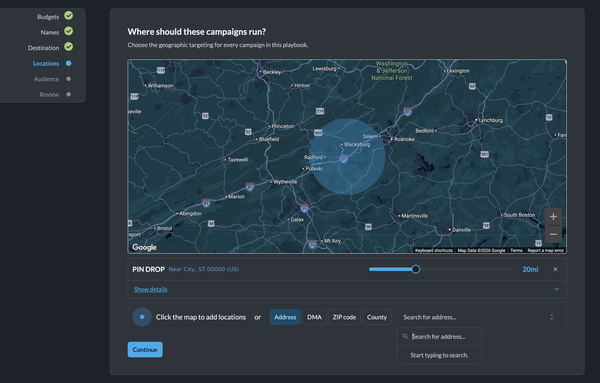
Set where the ads run. You can target by radius around the dealership, and by address, DMA, zip code, or county, and select more than one.
---
### **Step 7: Review Search Themes and Audiences**
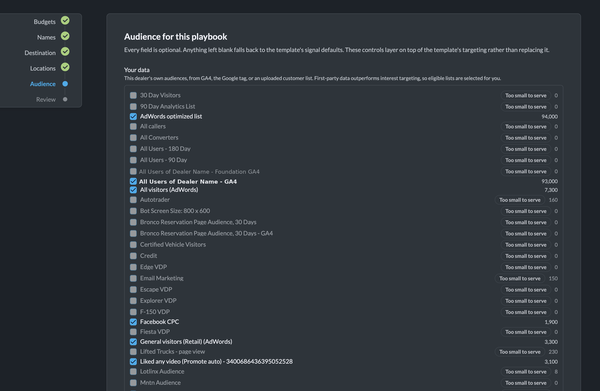
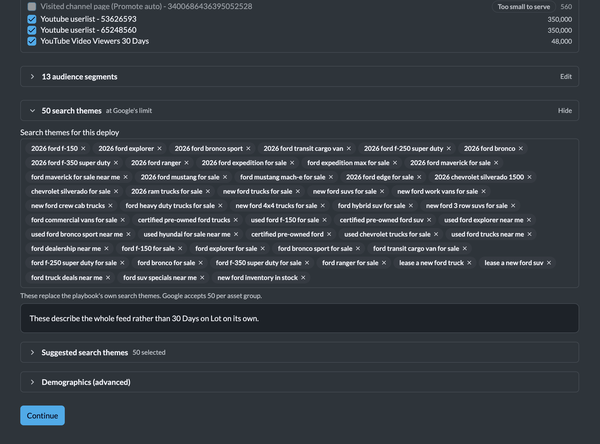
BuyerBridge auto-generates the **search themes** and **audience segments** for the campaign based on the product set you chose, so you do not have to build them by hand. Review what was generated, then continue.
---
### **Step 8: Review and Deploy**
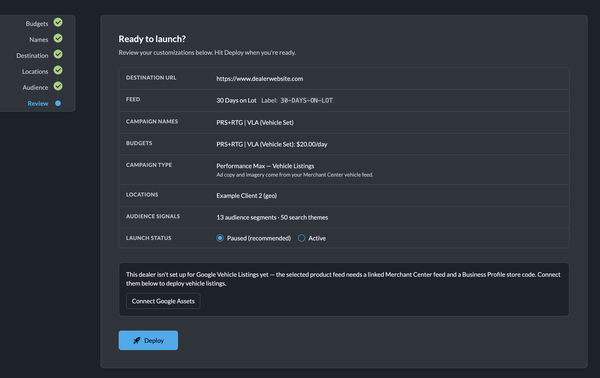
Do a final check of the budget, campaign name, destination URL, product set, and location, then click **Deploy**. The campaign deploys **paused**.
---
### **What Happens After You Deploy**
The campaign sits **paused** until it is turned live. If the feed is still pending in Merchant Center, it stays paused with an awaiting-approval status rather than going active.
Once it is live, check within a day or two that:
- Vehicles are approved and serving in Merchant Center
- The campaign is eligible, not limited
- Impressions are starting to populate
**💡 Note:** If vehicles are not showing, check Merchant Center. The most common causes are a feed still pending approval, or vehicles disapproved for missing images or for stock or AI-generated photos that do not represent the actual vehicle.
---
#### **Continue Learning**
- **Back to Hub:** [Google Tools 101: Starting Guide](https://support.buyerbridge.com/knowledge/google-tools-101-starting-guide?hsLang=en)
- **Related:** [How to Deploy a Google Search Campaign with Playbooks](https://support.buyerbridge.com/knowledge/how-to-deploy-a-google-search-campaign-with-playbooks?hsLang=en)
- **Related:** [How to Onboard a Client's Google Channel](https://support.buyerbridge.com/knowledge/how-to-onboard-a-clients-google-channel?hsLang=en)
- **Related:** [Using the Google Vehicle Advertising Report](https://support.buyerbridge.com/knowledge/google-vehicle-advertising-report-in-buyerbridge?hsLang=en)
- [Getting Started](https://support.buyerbridge.com/knowledge/getting-started?hsLang=en#main-content)
- [Welcome Kit](https://support.buyerbridge.com/knowledge/getting-started?hsLang=en#welcome-kit)
- [Getting Started](https://support.buyerbridge.com/knowledge/getting-started?hsLang=en#getting-started)
- [Navigating the Platform](https://support.buyerbridge.com/knowledge/getting-started?hsLang=en#navigating-the-platform)
- [Account Management](https://support.buyerbridge.com/knowledge/getting-started?hsLang=en#account-management)
- [Onboarding Clients](https://support.buyerbridge.com/knowledge/onboarding-clients?hsLang=en#main-content)
- [Channel Onboarding](https://support.buyerbridge.com/knowledge/onboarding-clients?hsLang=en#channel-onboarding)
- [Google Onboarding](https://support.buyerbridge.com/knowledge/onboarding-clients?hsLang=en#google-onboarding)
- [Meta Onboarding](https://support.buyerbridge.com/knowledge/onboarding-clients?hsLang=en#meta-onboarding)
- [Pinterest Onboarding](https://support.buyerbridge.com/knowledge/onboarding-clients?hsLang=en#pinterest-onboarding)
- [SEO Onboarding](https://support.buyerbridge.com/knowledge/onboarding-clients?hsLang=en#seo-onboarding)
- [Snapchat Onboarding](https://support.buyerbridge.com/knowledge/onboarding-clients?hsLang=en#snapchat-onboarding)
- [TikTok Onboarding](https://support.buyerbridge.com/knowledge/onboarding-clients?hsLang=en#tiktok-onboarding)
- [Platform Tools](https://support.buyerbridge.com/knowledge/platform-tools?hsLang=en#main-content)
- [Ad Builder](https://support.buyerbridge.com/knowledge/platform-tools?hsLang=en#ad-builder)
- [Ad Launcher](https://support.buyerbridge.com/knowledge/platform-tools?hsLang=en#ad-launcher)
- [Ads Library](https://support.buyerbridge.com/knowledge/platform-tools?hsLang=en#ads-library)
- [Best Practices](https://support.buyerbridge.com/knowledge/platform-tools?hsLang=en#best-practices)
- [Budgeting](https://support.buyerbridge.com/knowledge/platform-tools?hsLang=en#budgeting)
- [Campaign Management](https://support.buyerbridge.com/knowledge/platform-tools?hsLang=en#campaign-management)
- [EventFlow](https://support.buyerbridge.com/knowledge/platform-tools?hsLang=en#eventflow)
- [MarketAnalyzer](https://support.buyerbridge.com/knowledge/platform-tools?hsLang=en#marketanalyzer)
- [Playbooks](https://support.buyerbridge.com/knowledge/platform-tools?hsLang=en#playbooks)
- [SEOFlow](https://support.buyerbridge.com/knowledge/platform-tools?hsLang=en#seoflow)
- [Reports](https://support.buyerbridge.com/knowledge/platform-tools?hsLang=en#reports)
- [VINFlow](https://support.buyerbridge.com/knowledge/platform-tools?hsLang=en#vinflow)
- [White Labeling](https://support.buyerbridge.com/knowledge/platform-tools?hsLang=en#white-labeling)
- [Multichannel Advertising](https://support.buyerbridge.com/knowledge/multichannel-advertising?hsLang=en#main-content)
- [Overview](https://support.buyerbridge.com/knowledge/multichannel-advertising?hsLang=en#overview)
- [Google](https://support.buyerbridge.com/knowledge/multichannel-advertising?hsLang=en#google)
- [Meta](https://support.buyerbridge.com/knowledge/multichannel-advertising?hsLang=en#meta)
- [Pinterest](https://support.buyerbridge.com/knowledge/multichannel-advertising?hsLang=en#pinterest)
- [Snapchat](https://support.buyerbridge.com/knowledge/multichannel-advertising?hsLang=en#snapchat)
- [TikTok](https://support.buyerbridge.com/knowledge/multichannel-advertising?hsLang=en#tiktok)
- [Agency Sales Assets](https://support.buyerbridge.com/knowledge/agency-sales-assets?hsLang=en#main-content)
- [Facebook Sales Assets](https://support.buyerbridge.com/knowledge/agency-sales-assets?hsLang=en#facebook-sales-assets)
- [Google Sales Assets](https://support.buyerbridge.com/knowledge/agency-sales-assets?hsLang=en#google-sales-assets)
- [Graphics & Web Elements](https://support.buyerbridge.com/knowledge/agency-sales-assets?hsLang=en#graphics-web-elements)
- [Instagram Sales Assets](https://support.buyerbridge.com/knowledge/agency-sales-assets?hsLang=en#instagram-sales-assets)
- [Meta Sales Assets](https://support.buyerbridge.com/knowledge/agency-sales-assets?hsLang=en#meta-sales-assets)
- [Omnichannel Sales Assets](https://support.buyerbridge.com/knowledge/agency-sales-assets?hsLang=en#omnichannel-sales-assets)
- [Pinterest Sales Assets](https://support.buyerbridge.com/knowledge/agency-sales-assets?hsLang=en#pinterest-sales-assets)
- [Snapchat Sales Assets](https://support.buyerbridge.com/knowledge/agency-sales-assets?hsLang=en#snapchat-sales-assets)
- [TikTok Sales Assets](https://support.buyerbridge.com/knowledge/agency-sales-assets?hsLang=en#tiktok-sales-assets)
- [SEO for Dealers](https://support.buyerbridge.com/knowledge/agency-sales-assets?hsLang=en#seo-for-dealers)
- [Product Updates & Enhancements](https://support.buyerbridge.com/knowledge/product-updates-enhancements?hsLang=en#main-content)
- [Enhancements](https://support.buyerbridge.com/knowledge/product-updates-enhancements?hsLang=en#enhancements)
- [Product Updates](https://support.buyerbridge.com/knowledge/product-updates-enhancements?hsLang=en#product-updates)
- [Announcements](https://support.buyerbridge.com/knowledge/product-updates-enhancements?hsLang=en#announcements)
- [Monthly Updates](https://support.buyerbridge.com/knowledge/product-updates-enhancements?hsLang=en#monthly-updates)
- [Metrics](https://support.buyerbridge.com/knowledge/metrics?hsLang=en#main-content)
- [Offline Events](https://support.buyerbridge.com/knowledge/metrics?hsLang=en#offline-events)
- [Metrics Defined](https://support.buyerbridge.com/knowledge/metrics?hsLang=en#metrics-defined)
- [Leads](https://support.buyerbridge.com/knowledge/metrics?hsLang=en#leads)
- [Reporting](https://support.buyerbridge.com/knowledge/metrics?hsLang=en#reporting)
- [SEO Reporting](https://support.buyerbridge.com/knowledge/metrics?hsLang=en#seo-reporting)
- [Supported Providers](https://support.buyerbridge.com/knowledge/supported-providers?hsLang=en#main-content)
- [CRM Integrations](https://support.buyerbridge.com/knowledge/supported-providers?hsLang=en#crm-integrations)
- [Inventory & Feed Providers](https://support.buyerbridge.com/knowledge/supported-providers?hsLang=en#inventory-feed-providers)
- [Website Providers](https://support.buyerbridge.com/knowledge/supported-providers?hsLang=en#website-providers)
- [3rd Party Support](https://support.buyerbridge.com/knowledge/3rd-party-support?hsLang=en#main-content)
- [Google Help Center](https://support.buyerbridge.com/knowledge/3rd-party-support?hsLang=en#google-help-center)
- [Facebook Platform Help](https://support.buyerbridge.com/knowledge/3rd-party-support?hsLang=en#facebook-platform-help)
- [TikTok Help Center](https://support.buyerbridge.com/knowledge/3rd-party-support?hsLang=en#tiktok-help-center)
[](https://buyerbridge.com/)
buyerbridge.com | Help Center
Copyright © 2026, Dealers United