![BuyerBridge_LOGO-dark-2.png]](https://support.buyerbridge.com/hs-fs/hubfs/BuyerBridge_LOGO-dark-2.png?height=40&name=BuyerBridge_LOGO-dark-2.png)
Google Search campaigns run on keywords, not inventory, so you can deploy them for a client as soon as the Google channel is connected, even before Merchant Center inventory is approved.
This guide covers the full Search deployment flow.
For the big picture on Google in BuyerBridge, start with the Google Tools 101 hub.
💡 Note: Deploying Google campaigns requires the Google channel set up on the client's account. If you have not connected it yet, see Onboarding Google in BuyerBridge first.
Quick Links
- Before You Get Started
- Choose Your Search Playbook
- Step 1: Open the Playbook and Start Deployment
- Step 2: Set Campaign Budgets
- Step 3: Choose the Brand (OEM)
- Step 4: Name Your Campaigns
- Step 5: Set the Destination URL
- Step 6: Set Location Targeting
- Step 7: Build Your Keywords
- Step 8: Review and Edit Ad Copy
- Step 9: Review and Deploy
- What Happens After You Deploy
🚧 Before You Get Started
Make sure the client's Google channel is connected in BuyerBridge, with the Google Ads account created or linked and the Business Profile confirmed. The sitelinks and other account-level assets that appear with Search ads are set during onboarding, so complete onboarding first.
Good to know: Search campaigns do not need approved inventory. Unlike PMAX and VLAs, a Search campaign can go out the day you onboard the client.
Choose Your Search Playbook
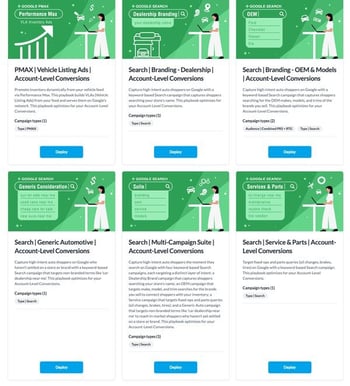
BuyerBridge offers several Search playbooks, so you can deploy a full set at once or add a single focus:
- Multi-Campaign Suite: deploys four Search campaigns together, Dealership Branding, OEM & Models, Service & Parts, and Generic Automotive. This is the common starting point for a new client.
- Dealership Branding: captures shoppers searching the store's name.
- OEM & Models: targets make, model, and trim searches for the brands the dealer sells.
- Service & Parts: targets fixed-ops and parts queries like oil changes, brakes, and tires.
- Generic Automotive: targets non-branded terms like "car dealership near me" to reach in-market shoppers who have not settled on a store yet.
The deployment steps below are the same no matter which one you choose.
Step 1: Start Deployment
- Go to the Google channel for the client.
- Select the Search Playbook you want to deploy.
- Click Deploy, then select Google as the platform.
You will move through the deployment as a set of steps shown on the left, the same step-by-step style as onboarding.
Step 2: Set Campaign Budgets
Set a daily budget for each campaign. The minimum is $5 per day.
The Search Suite playbook includes the campaigns from the 4 individual Search Playbooks, with these suggested starting daily budgets:
| Campaign | Type | Suggested Daily Budget |
| Brand Core Dealerships | Search | $10 |
| OEM Dealerships & Cars | Search | $20 |
| Service & Parts | Search | $10 |
| Generic Consideration | Search | $10 |
Adjust any budget to fit the client's monthly plan, then click Continue.
Tip: A quick way to set a daily budget is the client's monthly budget divided by the number of days in the month, minus a few dollars for "padding."
Step 3: Choose the Brand (OEM)
The brand sets the OEM-specific keywords and copy for the campaigns. Choose the client's OEM so the campaigns use the right brand terms. For a dealership that carries more than one brand, run the deployment once per brand, for example, once for Ford and once for Chevrolet.
Step 4: Review Campaign Names
BuyerBridge fills in the campaign names from the Playbook. Change the campaign names if desired so they are easy to find in the client's account.
Step 5: Set the Destination URL
Enter the URL where you want the ads to send traffic, usually the dealer's inventory or a relevant landing page.
Step 6: Set Location Targeting
Set where the ads run. You can target by radius around the dealership, and by address, DMA, zip code, or county, and select more than one. A common starting point for a dealership is about 25 miles around the store plus the top nearby cities.
Step 7: Build Your Keywords
BuyerBridge builds your keyword list for you, so you are not starting from a blank field. Review the suggestions, then fine-tune from there.
Keyword suggestions. BuyerBridge suggests keywords from a blend of Ahrefs data and Google Keyword Planner, factoring in the client's live inventory. Each suggestion shows search volume, average cost, difficulty, and a short reason it is recommended, so you can choose with confidence. For the full detail, see How Keyword Suggestions Work in Google Search Playbooks.
Optimize from there. Once the suggestions are in, tighten the list:
- Keep ad groups single-theme. Aim for 5 to 15 keywords per ad group, all on one theme. Keep "Ford F-150 lease" separate from "Ford F-150 used." Up to about 20 is fine if a campaign needs more impressions.
- Set match types with intent. Use all three where the account is actively managed. For hands-off partners, default to Phrase and Exact, and keep Brand campaigns on Phrase and Exact. Use Broad only with a strong negative list.
- Add negative keywords. Campaign-level for universal junk like "free," "jobs," "recall," and "salvage." The client's own name is added as a negative in non-brand campaigns automatically. Add brand and competitor terms too.
Step 8: Review and Edit Ad Copy
Google Search ads are responsive, so you provide a set of headlines and descriptions and Google assembles the ad. BuyerBridge pre-fills tokenized copy tailored to each ad group, up to 15 headlines and 4 descriptions, and supports Dynamic Keyword Insertion and auto-created assets like sitelinks. Review the copy and adjust any lines that need it before you deploy.
Step 9: Review and Deploy
Do a final check of the budgets, campaign names, destination URL, and locations, then click Deploy.
What Happens After You Deploy
Campaigns deploy paused. Nothing spends until the client goes in, verifies everything looks right, and turns the campaigns live, the same as Meta.