![BuyerBridge_LOGO-dark-2.png]](https://support.buyerbridge.com/hs-fs/hubfs/BuyerBridge_LOGO-dark-2.png?height=40&name=BuyerBridge_LOGO-dark-2.png)
Onboarding is how you connect the right channel access and dependencies so campaigns can launch cleanly and reporting works without gaps. The fastest teams follow the same pattern every time: prep the channel assets, authenticate the channel once, then add the client account, and complete the setup steps inside BuyerBridge.
Quick Links
- Before You Get Started
- Step 1: Prep Channel Assets
- Step 2: Authenticate the Channel (Connection User)
- Step 3: Add a Client Account
- Step 4: Select the Channel and Package
- Step 5: Set Up Inventory
- Step 6: Set Up Tracking
- Step 7: Set Lead Destinations
- Step 8: Connect Assets and Finalize
- Troubleshooting
🚧 Before You Get Started
Have these ready before you start onboarding any channel:
What you need for every channel
-
Client business name + address (for searching/confirming the correct business)
-
Correct admin access to the channel accounts you plan to connect
-
A plan for who “owns” credentials so onboarding does not stall
What you need for Google
-
A "master" Google login with admin access to the client's Google Ads account
-
Access to the client's Google Business Profile
-
Access to the client's Google Analytics (GA4), used for conversion tracking and reporting
- Access to the client's Google Merchant Center (required for Vehicle Listing Ads and Performance Max inventory campaigns)
- A square business logo, since Google requires a logo to run ads
- Optional: Google Search Console access for added reporting insights
Step 1: Prep Channel Assets
Before you click around in BuyerBridge, make sure the channel’s required assets exist. If the channel assets are not ready, BuyerBridge setup will stop and wait.
Use these channel-specific setup guides:
- Facebook: How To Create and Connect Assets for Facebook (Meta) Onboarding
- Google: How to Onboard a Client's Google Channel
- Pinterest: Setting Up The Pinterest Business Center For Your Organization + Clients
- Snapchat: How To Create and Connect Assets for Snapchat Onboarding
- TikTok: How To Create and Connect Assets for TikTok Onboarding
Once you complete the steps in the guide(s) above, you are ready to enroll the client in their new channel(s) inside BuyerBridge.
Step 2: Authenticate the Channel (User Connection)
Before you onboard a client to a channel for the first time, you must complete a Channel Authentication for that platform.
Important: BuyerBridge only requires your organization to set up the User Connection one time per channel.
What you need to do first:
-
Log in to an existing account within the channel, or
-
Create a new channel account if one does not exist (use the channel asset guides above)
What is Multichannel Authentication?
When your organization onboards a new channel for a client for the first time only, you will be required to click Authenticate and Setup for that channel.
Setting up a Connected User is necessary to deploy campaigns, retrieve metrics, and complete other channel tasks for clients.
🔗 To learn more about this process, read: How to Authenticate the Connection User For New Channels in BuyerBridge.
Step 3: Add a Client Account
After Multichannel Authentication is complete, return to the BuyerBridge dashboard.
-
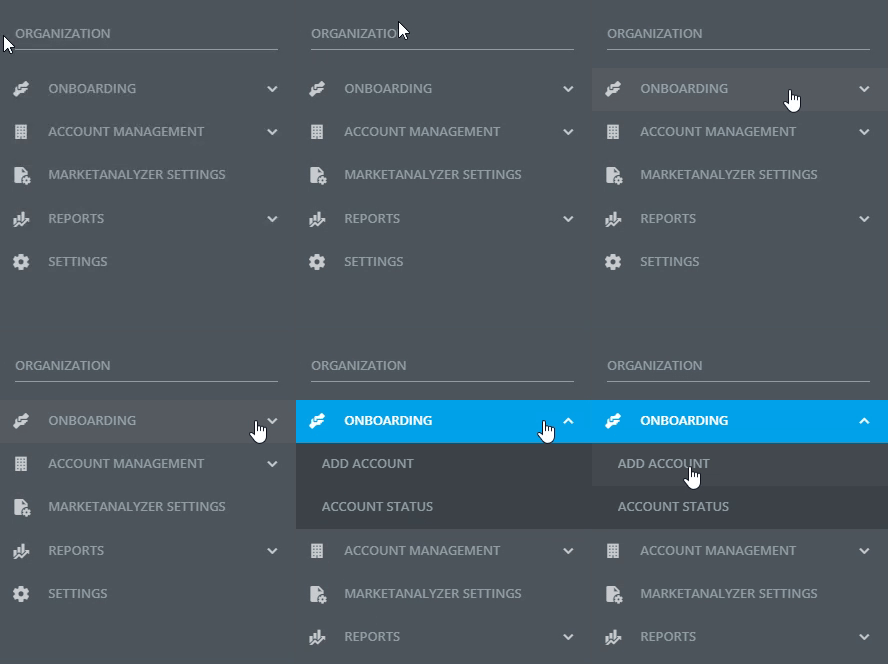
In the left navigation, go to Onboarding > Add Account
-
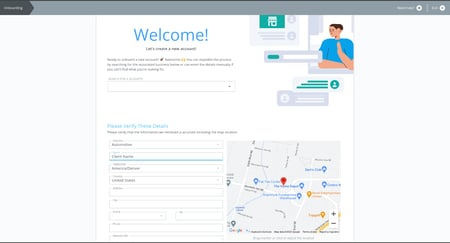
Select the associated business from the dropdown
-
If you cannot find it, enter the business details manually
This starts onboarding for a new client account.
Step 4: Select Channels and Choose a Package
-
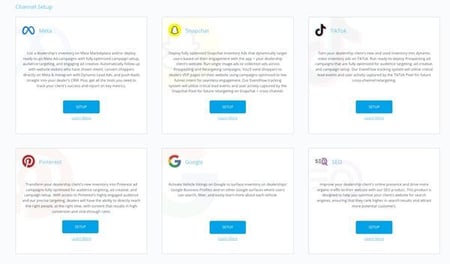
Choose the channel you want to onboard (Meta, Google, TikTok, Snapchat, Pinterest)
-
Click Setup next to that channel
-
Follow the steps shown on screen
-
Select the product package you want to add
💡 Note: The steps after this point vary by channel and package. Google, for example, includes its own Business Profile, Merchant Center, and conversion setup, covered in the Google onboarding guide. The steps below cover the shared inventory, tracking, and asset setup.
Step 5: Set Up Inventory
Choose how inventory is sent to BuyerBridge:
- Website Inventory: BuyerBridge scrapes the client's website and refreshes the data regularly.
- Feed Inventory (recommended): pulls from a data file for the most reliable inventory.
Feed Inventory (recommended)
- Choose the inventory feed provider. If you do not see it, use the "click here if you don't see your provider" link.
- Enter the required information.
- Click Validate ID before continuing
🚦Inventory Status: Inventory can take time to process. You can keep onboarding, but processing must finish before you can complete onboarding.
After the feed loads, verify the new and used vehicle data looks right, then confirm the pricing and terms to continue.
Step 6: Set Up Tracking
Tracking is how events, call tracking, and retargeting audiences flow into BuyerBridge.
For most channels, this runs through EventFlow, the BuyerBridge pixel. To enable it, the client's website provider installs the EventFlow code on the site. From the onboarding screen you can copy, download, or email the EventFlow code and instructions, then select the site provider to follow the install steps.
💡 Note for Google: Google conversion tracking is set up through GA4 during Google onboarding, so the EventFlow pixel is not required for Google campaigns. See the Google onboarding guide for how conversions are set and de-duplicated.
Step 7: Set Lead Destinations
Lead destinations tell BuyerBridge where to send leads that come in through the channel, chatbots, or API setups.
- Click Add Lead Destination.
- Choose a destination type: ADF XML, Plain Text, or Webhook.
- Click Continue.
Step 8: Connect Assets & Finalize
Before you can finish, connect the channel's assets (its dependencies) to BuyerBridge.
- Use the dropdowns to select the correct asset for each dependency, such as Ad Account, Pixel, and Catalog. The exact dependencies vary by channel.
- Click Continue and Review to confirm accuracy.
- If everything is correct, click Complete Onboarding.
If anything is missing, BuyerBridge lists the items that still need attention before you can finish.
The Connect Assets screen varies slightly by platform, depending on what that channel requires.
Troubleshooting
- Setup paused or will not continue: a required channel asset is usually missing. Recheck Step 1 for that channel.
- Inventory not finishing: processing must fully complete before onboarding can be finalized. Give the feed time, then recheck.
- Cannot complete onboarding: open the list BuyerBridge shows and resolve each flagged dependency.
Still stuck? Reach out to your Partner Experience Manager or email BuyerBridge Support at support@buyerbridge.com.