Last updated: 5/30/2023
The Ad Launcher helps you deploy ads you uploaded in the BuyerBridge Ad Builder or selected from the Ads Library across multiple channels at once.
With this tool, you will be able to set up your Campaign and Ad Set structure, select your geographic targeting, define your audience targeting & set your budgets — and then deploy your ads!
Quick links:
Let’s get started:
Deployment Preset Flow
Quick links:
- Choosing Your Objective
- Where do you want to deploy this ad? (Channel Selection)
- Customize your ad (Landing Page URLs)
- Geotargeting
- Budget & Budget Schedule
- Deploy!
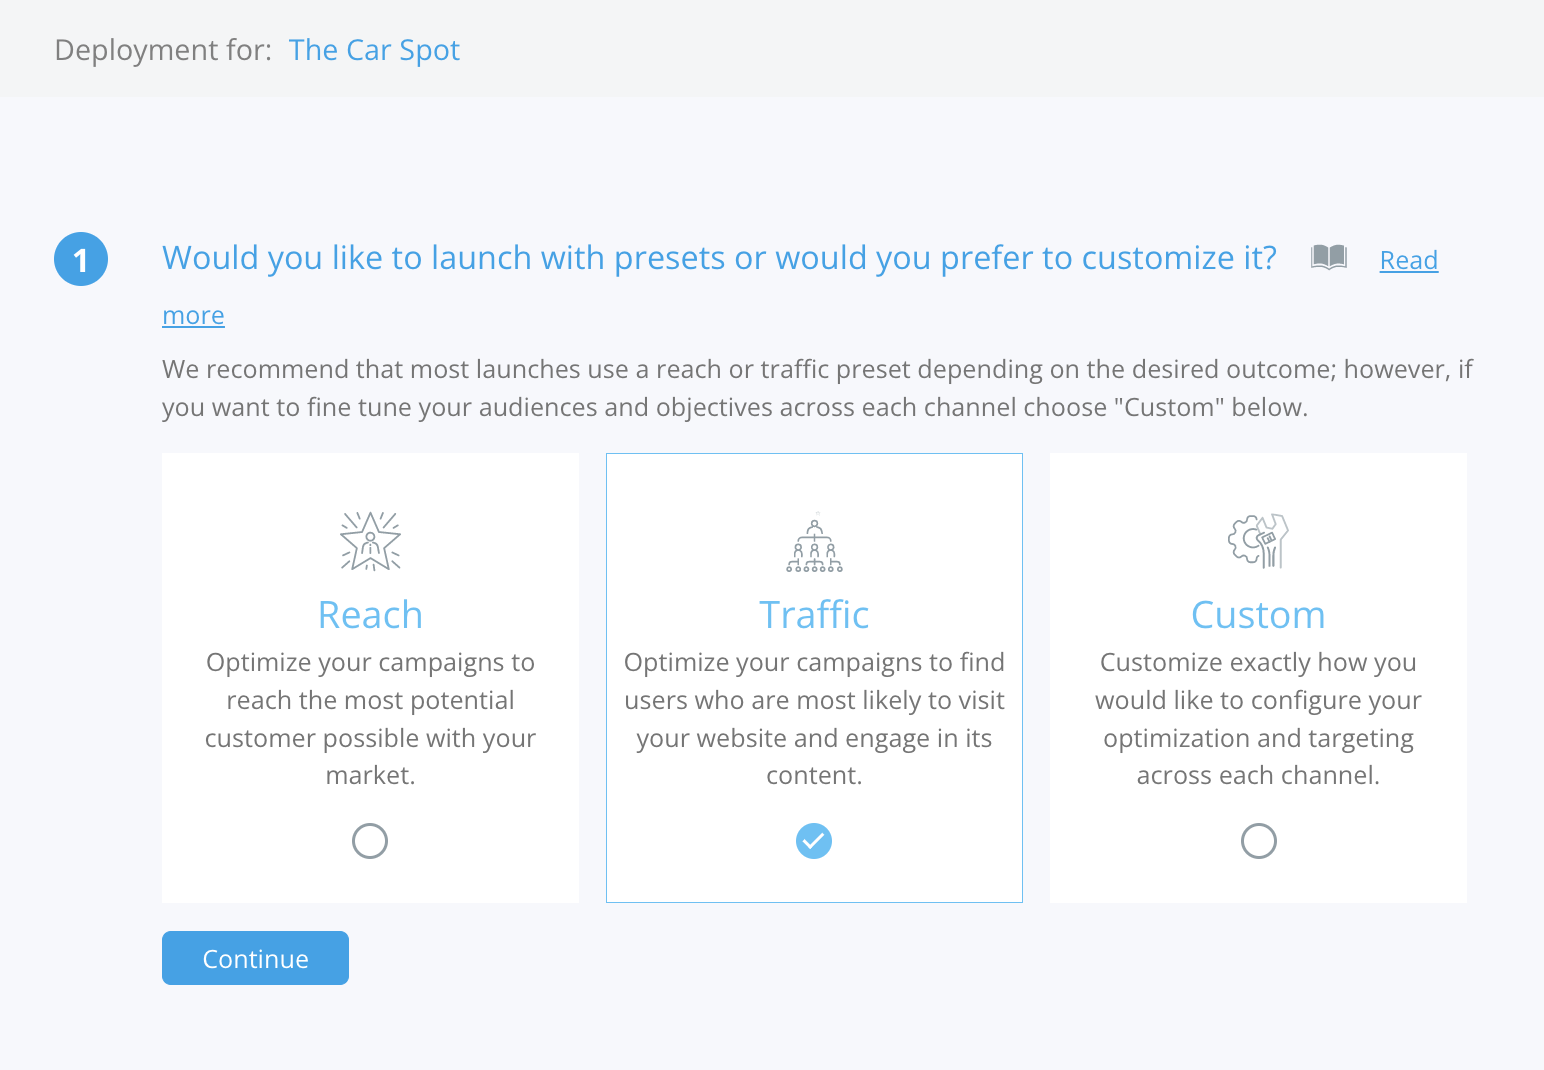
What Is A Preset?
A Preset is a predetermined objective selection for a campaign. The available objective options are Reach, Traffic, and Custom. When deploying a New Ad, you can choose to jump right into deployment with the preset objective. When a Preset is chosen, the following will be automatically selected:
- Ad Optimization
- Audience Refinement
You have the ability to edit any of the preset steps, if no edits are needed, you will begin the customization process on Where Do You Want To Run Ads?
Selecting A Deployment Preset In The Ad Launcher
When deploying an Ad, choose the account you want to deploy the Ad to > hit the blue Select button under New Campaign.

Note: Deploying an Ad via the Ad Builder or Ad Launcher will follow the same flow.
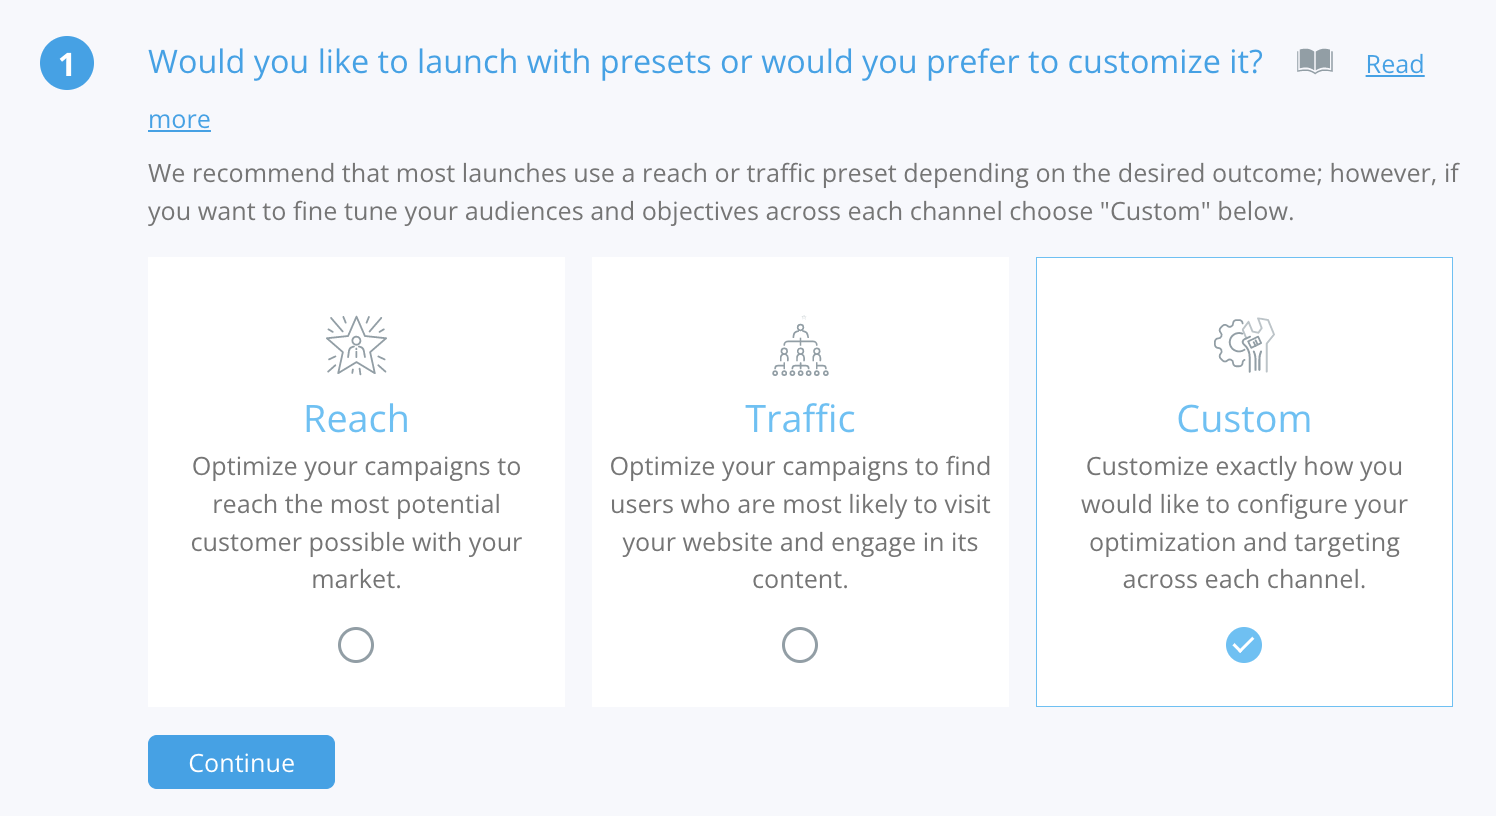
Choose A Deployment Preset
Select the objective that you would like to set for the campaign.
We recommend that most launches use a reach or traffic preset depending on the desired outcome; however, if you want to fine tune your audiences and objectives across each channel choose "Custom" below.
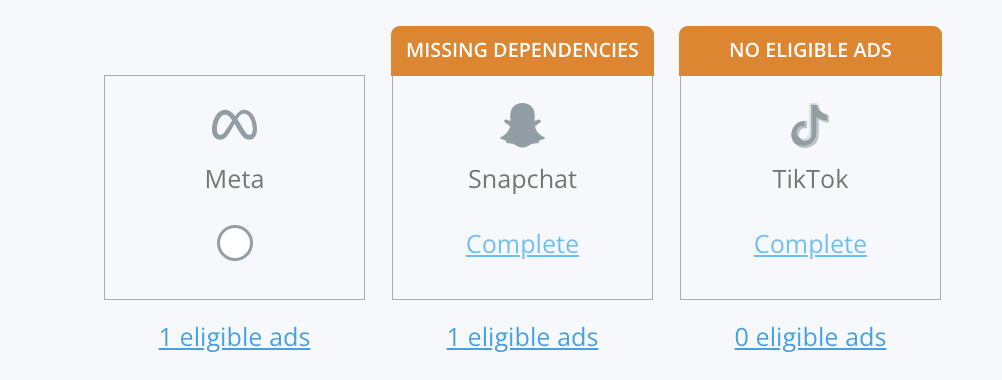
Channel Selection
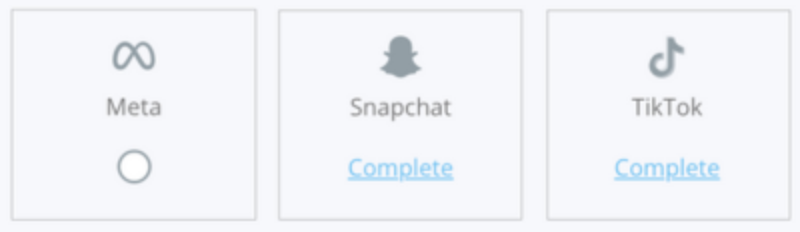
Verify the channels you want to deploy this ad to. You will be able to choose between Facebook (Meta), Snapchat, and TikTok.
-png-1.png)
Note: You will only be able to choose a channel that the client is onboarded to, or if the media you’ve uploaded in the Ad Builder is supported by that channel. If you get a “Missing Dependencies” error, click the “Complete” link to resolve it.
From this step, you can edit Campaign Name as well as change the Special Ads Category.
What’s a Special Ads Category?
Special Ad Categories include ads around Housing, Employment, and Credit. Examples of these are ads referring to loan services, employment ads, housing repair services, or sale and rental opportunities. A popular use case is automotive dealer clients, who are required to use Facebook’s Special Ad Category due to leasing and financing options on their website.
Customize Your Ad
Add the destination Landing Page URL(s) for each channel. If you created your ad in the Ad Builder, the fields will already auto-populate from what you previously entered.
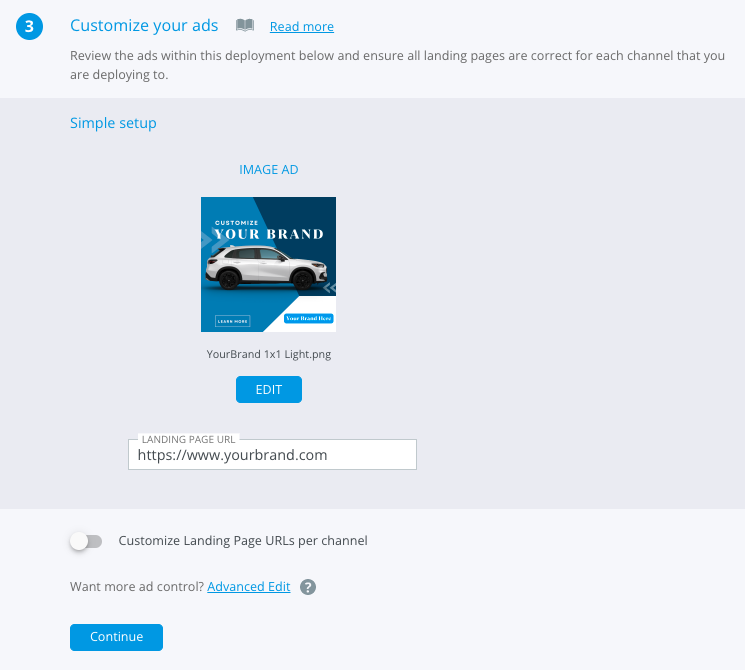
Note: If you select Advanced Edit, this will open up the Ad Builder where you can dive deeper into fine-tuning specifics of the Ad.
When using Advanced Edit, any changes that are made to the Ad(s) will be automatically updated to the Ad(s) that are being deployed. These updates will not update the base Ad(s), they will just modify for the current deployment.
The following steps will then be auto-selected based on your Deployment Preset.
You have the ability to edit the Optimization and refine the Audience if needed.
Where Do You Want Your Ads To Run?
For each of your selected channels for deployment, drop a pin on the map for where you want to target your ad.
Simple Geo Targeting
With Simple Geo Targeting the address that is in the BuyerBridge system will be selected by default.
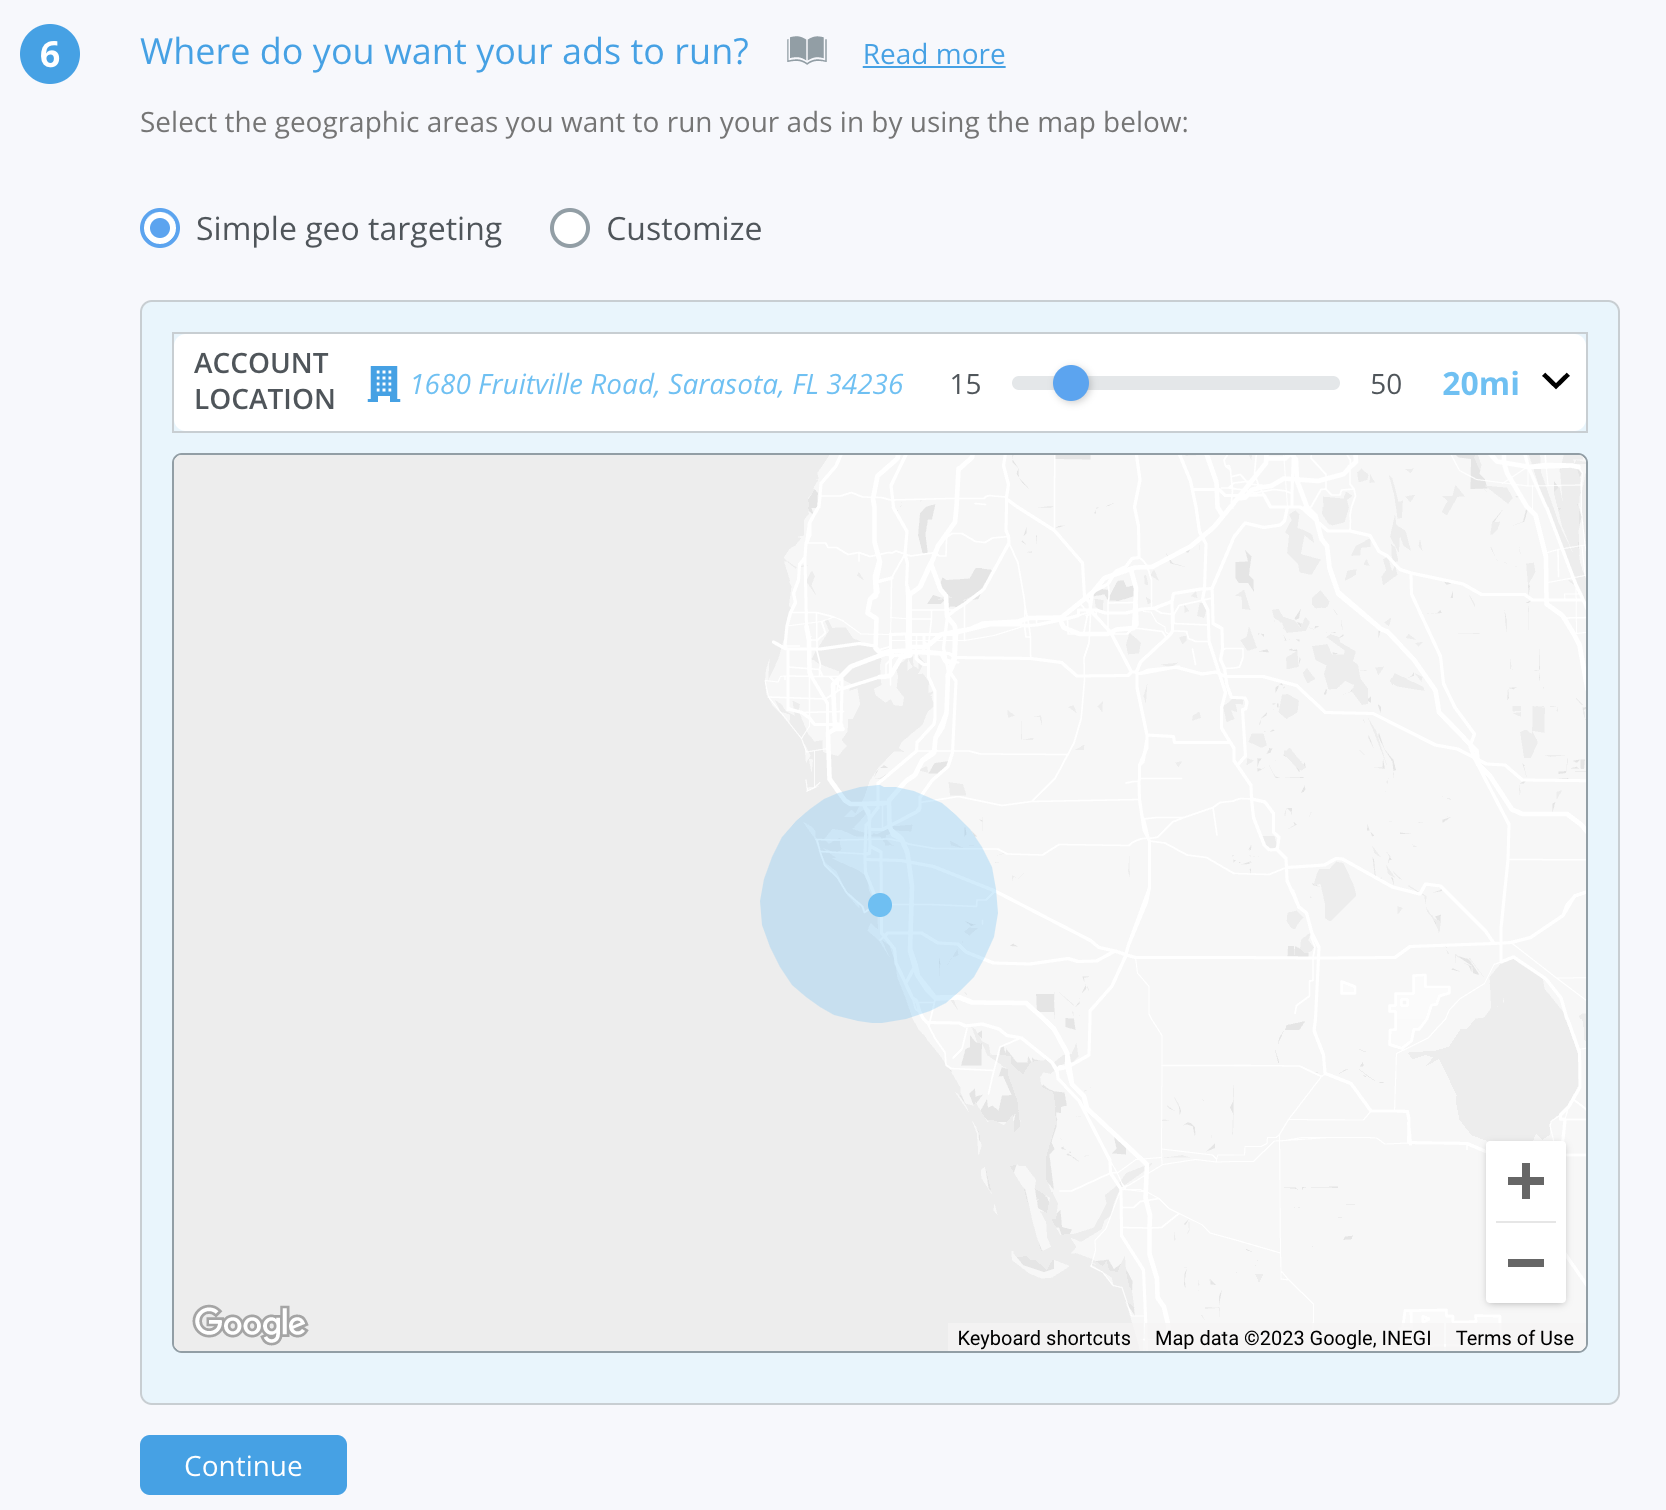
Once you have the selected location, you can adjust the radius targeting using the slider.
-png-1.png)
Note: Since TikTok currently only allows DMA (Designated Market Area) targeting, BuyerBridge will estimate your nearest DMA.
-png-1.png)
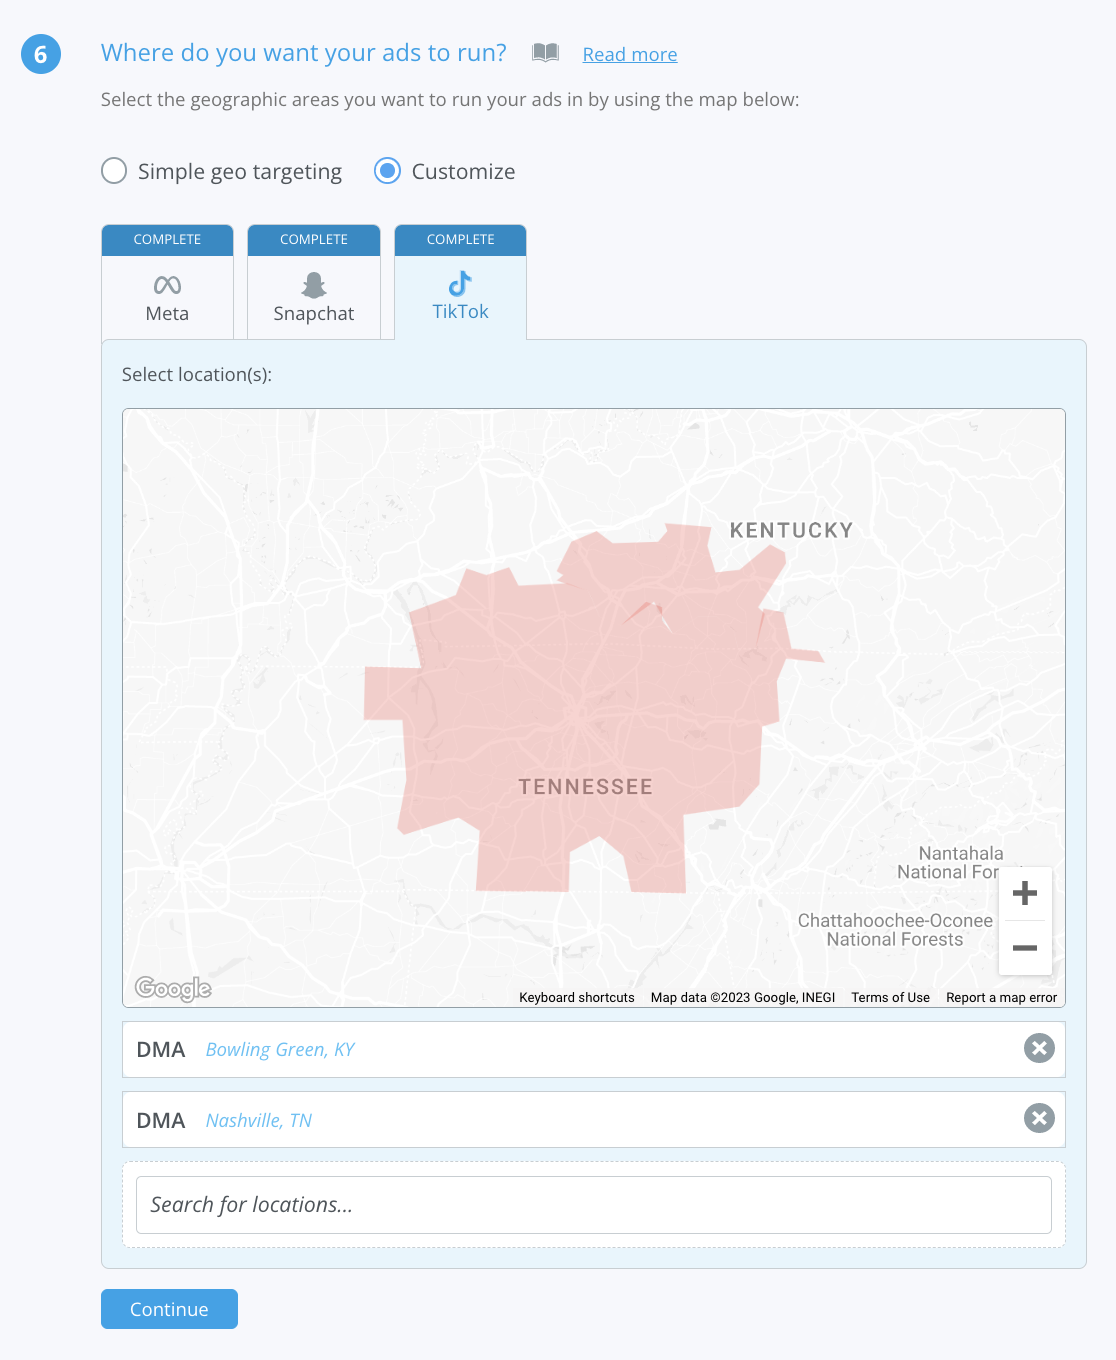
Customize
With Custom Geo Targeting you will be able to customize the target location by channel. You can select multiple locations per channel.
-png-1.png)
If the default or Pin location is not the address you want to target, you can enter the address in the search bar to find the correct one.
-png-1.png)
NOTE: Since TikTok currently only allows DMA (Designated Market Area) targeting, BuyerBridge will estimate your nearest DMA. If you do not like the estimated DMA, you can remove it or add a different DMA.
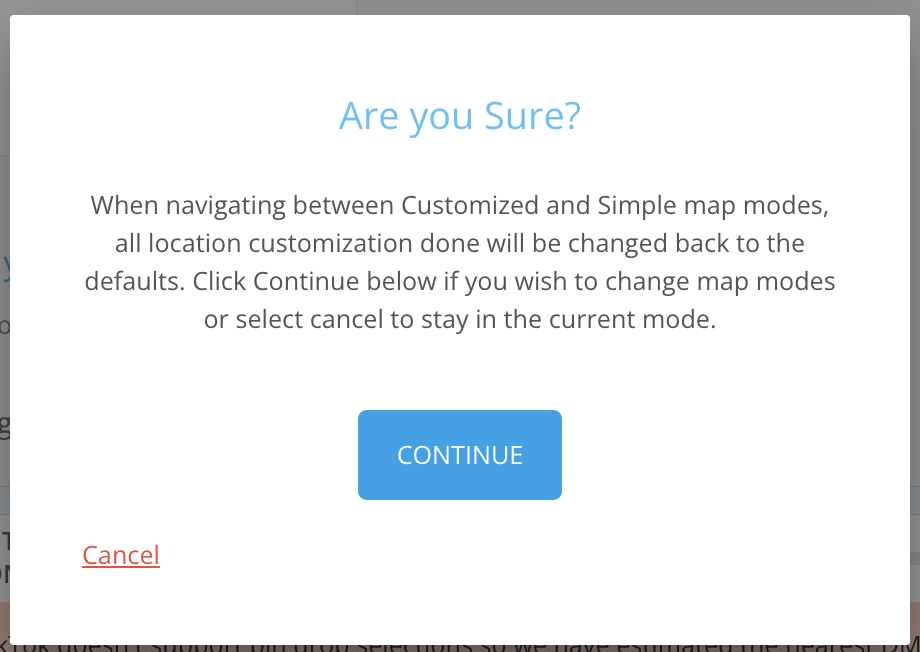
IMPORTANT: Be aware that if you go from Custom Targeting to Simple Targeting that any changes that were made will go back to the defaults.
How Much Do You Want To Spend & When Do You Want To Spend It?
Budget Schedule
Select from a daily or lifetime budget schedule. Depending on which you choose you will have the following options:
- Daily Budget
Under a daily budget schedule, the start date will default to “Immediately” and you have the option to set an end date.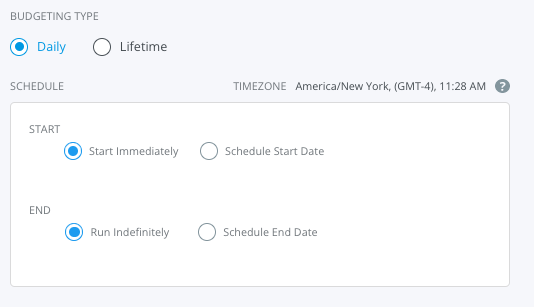
- Lifetime Budget
Under the Lifetime budget schedule, you will need to choose a start and end date.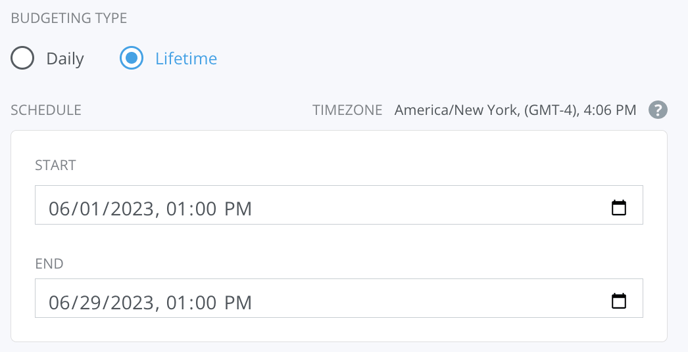
- Budget Calculation
Select whether you want to set your budget at the Campaign or Ad Set level, then input your desired spend.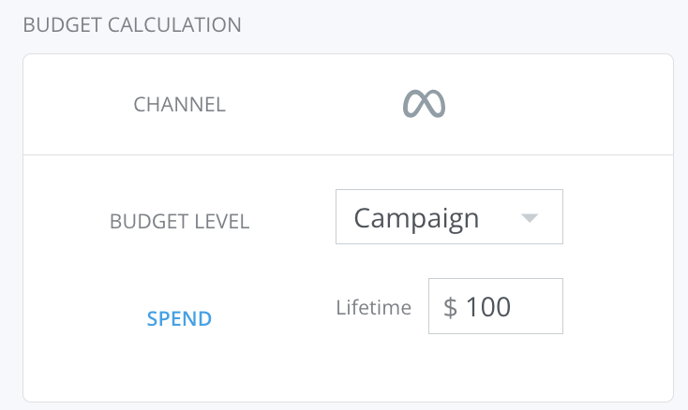
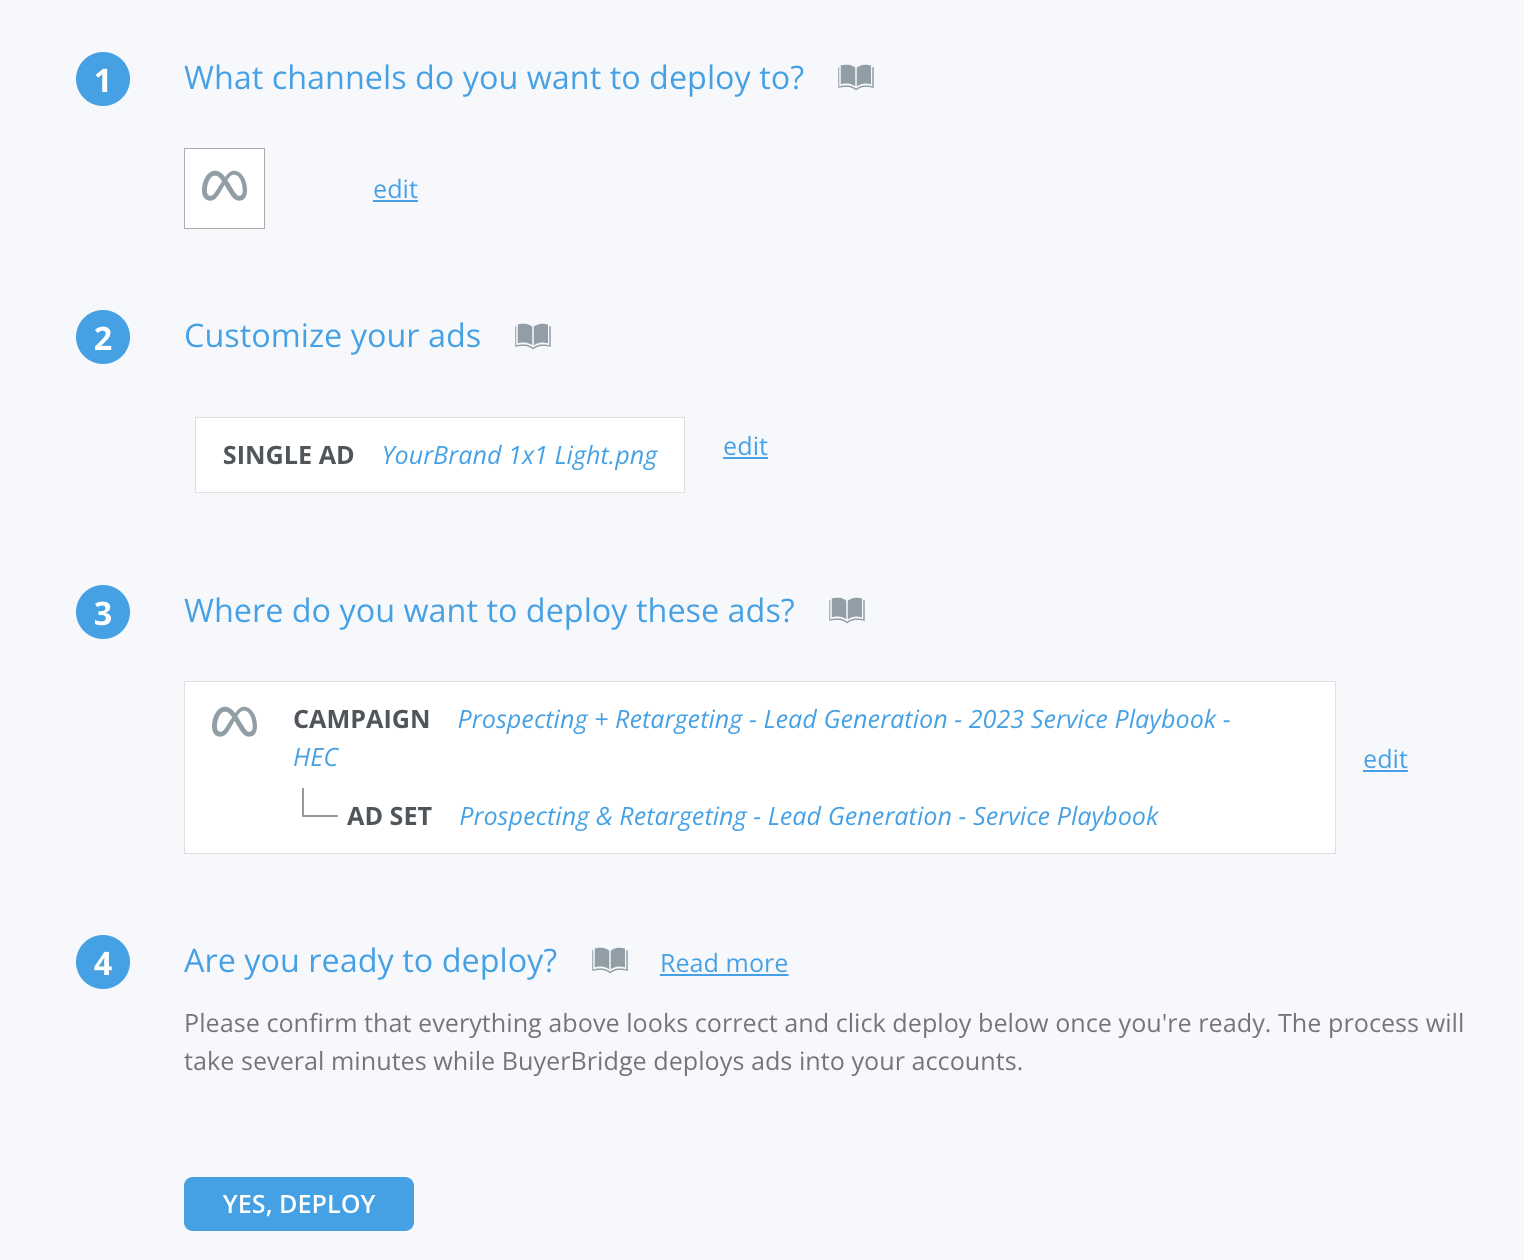
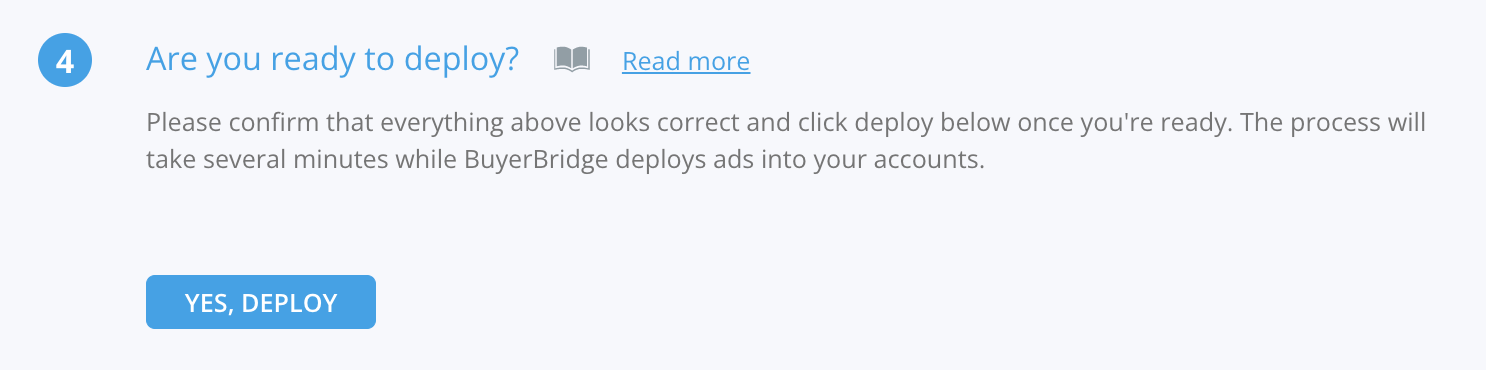
Are You Ready To Deploy?
Please confirm that everything you created looks correct and click Deploy once you’re ready.
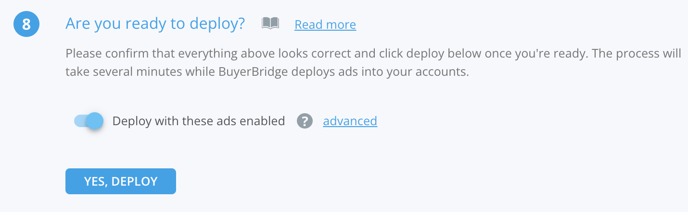
The "Deploy with these ads enabled" toggle controls whether each Campaign, Ad Set & Ads should be deployed as Enabled (on) or Disabled (off).
When Enabled, the Campaigns will begin spending across the selected platform once all Ads are approved and the Ad Accounts have a valid payment method.
After deployment, you can change the status under Campaign Management.
Custom Flow
Quick links:
- Choosing Your Objective
- Where do you want to deploy this ad? (Channel Selection)
- Customize your ad (Landing Page URLs)
- Optimize Your Ad(Optimization Strategy)
- Audience Refinement
- Geotargeting
- Budget & Budget Schedule
- Deploy!
When deploying an Ad, choose the account you want to deploy the Ad to > hit the blue Select button under New Campaign.
Note: Deploying an Ad via the Ad Builder or Ad Launcher will follow the same flow.
Next, select the Custom objective for the campaign.
Channel Selection
Verify the channels you want to deploy this ad to. You will be able to choose between Facebook (Meta), Snapchat, and TikTok.
Note: You will only be able to choose a channel that the client is onboarded to, or if the media you’ve uploaded in the Ad Builder is supported by that channel. If you get a “Missing Dependencies” error, click the “Complete” link to resolve it.
From this step, you can edit Campaign Name as well as change the Special Ads Category.
What’s a Special Ads Category?
Special Ad Categories include ads around Housing, Employment, and Credit. Examples of these are ads referring to loan services, employment ads, housing repair services, or sale and rental opportunities. A popular use case is automotive dealer clients, who are required to use Facebook’s Special Ad Category due to leasing and financing options on their website.
Customize Your Ad
Add the destination Landing Page URL(s) for each channel. If you created your ad in the Ad Builder, the fields will already auto-populate from what you previously entered.
Note: If you select Advanced Edit, this will open up the Ad Builder where you can dive deeper into fine-tuning specifics of the Ad.
When using Advanced Edit, any changes that are made to the Ad(s) will be automatically updated to the Ad(s) that are being deployed. These updates will not update the base Ad(s), they will just modify for the current deployment.
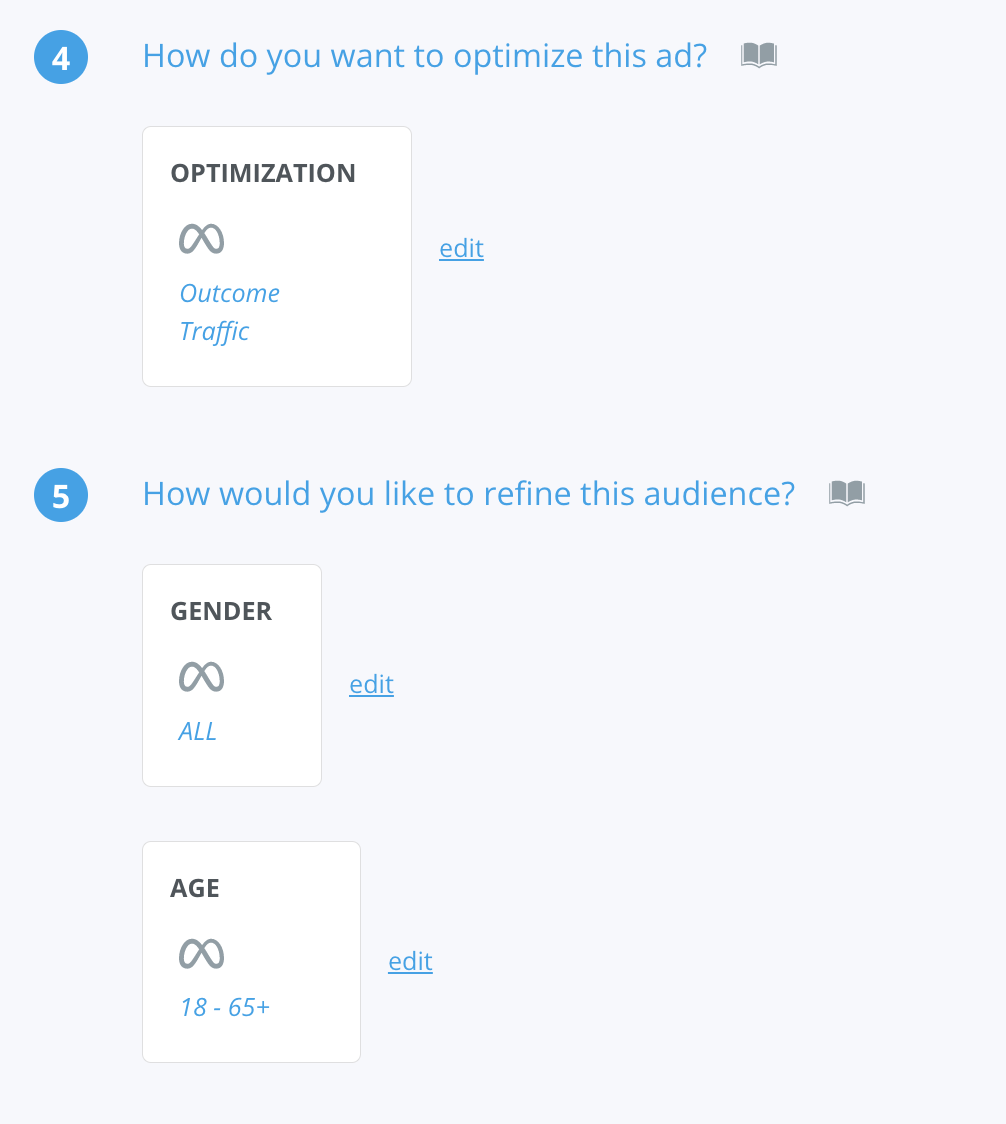
How Do You Want To Optimize This Ad?
For each of your channels, choose your optimization goal and strategy.
- Meta
- Select a Campaign Goal: Awareness, Reach, Clicks, Engagement, or Video Views
- Then select your Optimization Goal (how you want your conversions to be tracked and measured)
- Then select your Billing Event
- Learn more about Meta campaign objectives here // “we recommend”.
- Snapchat
- Select a Campaign Goal: Awareness, Video View, or Web View
- Then select your Optimization Goal (how you want your conversions to be tracked and measured)
- Then select your Billing Event
- TikTok
- Select a Campaign Goal: Reach, Traffic, or Video Views
- Then select your Optimization Goal (how you want your conversions to be tracked and measured)
- Then select your Billing Event
How Would You Like To Refine This Audience?
Refine your audience by Age or Gender and make your desired configurations for each category.
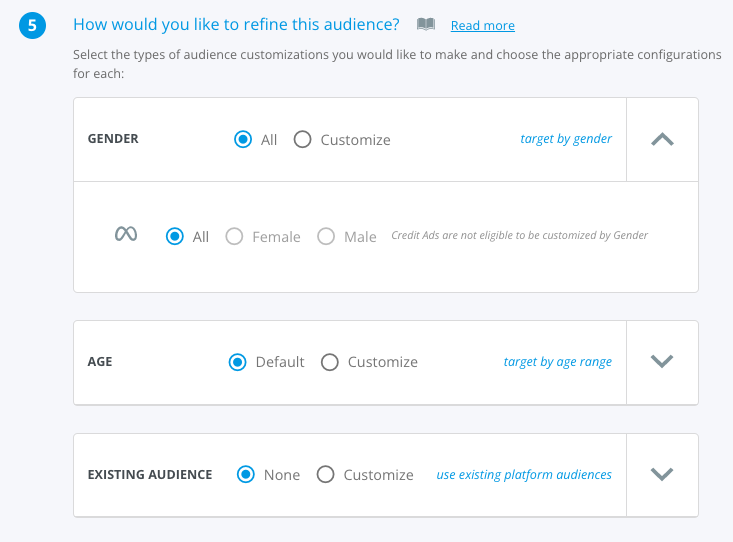
Under Existing Audience, use the dropdown menus provided to select one of your existing audiences saved in your Ads Managers. Note: If you have a lot of audiences, this may take some time to load.
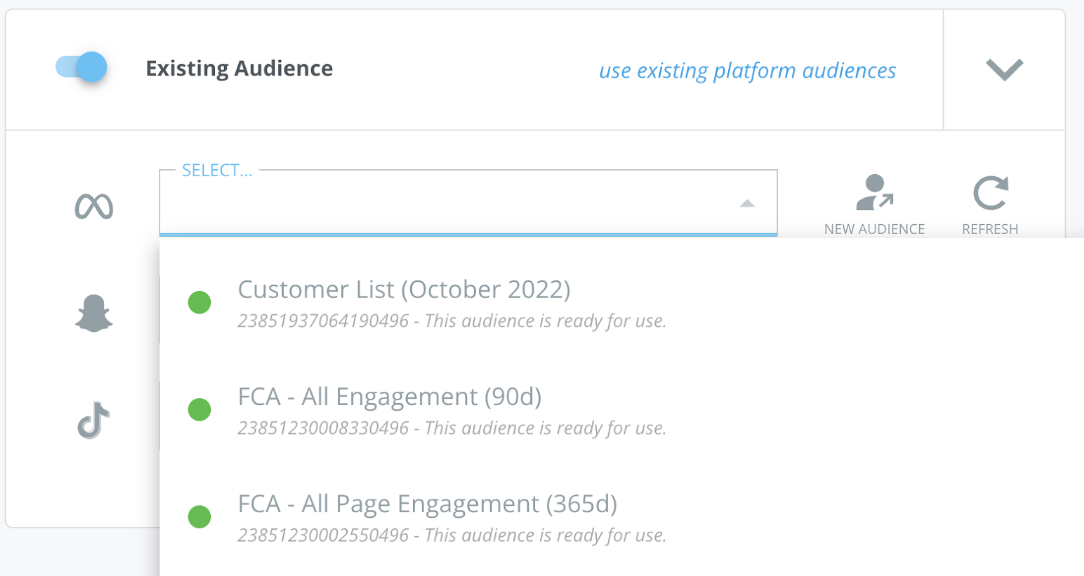
If you decide to create a new audience, use the “New Audience” icon on the right to link out to your Ads Manager where you can create it, then refresh this section by clicking the Refresh icon, and selecting your newly created item.
Where Do You Want Your Ads To Run?
For each of your selected channels for deployment, drop a pin on the map for where you want to target your ad.
Simple Geo Targeting
With Simple Geo Targeting the address that is in the BuyerBridge system will be selected by default.
Once you have the selected location, you can adjust the radius targeting using the slider.
Note: Since TikTok currently only allows DMA (Designated Market Area) targeting, BuyerBridge will estimate your nearest DMA.
Customize
With Custom Geo Targeting you will be able to customize the target location by channel. You can select multiple locations per channel.
If the default or Pin location is not the address you want to target, you can enter the address in the search bar to find the correct one.
NOTE: Since TikTok currently only allows DMA (Designated Market Area) targeting, BuyerBridge will estimate your nearest DMA. If you do not like the estimated DMA, you can remove it or add a different DMA.
IMPORTANT: Be aware that if you go from Custom Targeting to Simple Targeting that any changes that were made will go back to the defaults.
How Much Do You Want To Spend & When Do You Want To Spend It?
Budget Schedule
Select from a daily or lifetime budget schedule. Depending on which you choose you will have the following options:
- Daily Budget
Under a daily budget schedule, the start date will default to “Immediately” and you have the option to set an end date. - Lifetime Budget
Under the Lifetime budget schedule, you will need to choose a start and end date. - Budget Calculation
Select whether you want to set your budget at the Campaign or Ad Set level, then input your desired spend.
Are You Ready To Deploy?
Please confirm that everything you created looks correct and click Deploy once you’re ready.
The "Deploy with these ads enabled" toggle controls whether each Campaign, Ad Set & Ads should be deployed as Enabled (on) or Disabled (off).
When Enabled, the Campaigns will begin spending across the selected platform once all Ads are approved and the Ad Accounts have a valid payment method.
After deployment, you can change the status under Campaign Management.
Existing Campaign Flow
Quick links:
- Where do you want to deploy this ad? (Channel Selection)
- Customize your ad (Landing Page URLs)
- Where do you want to deploy this creative?
- Deploy!
Channel Selection
Verify the channels you want to deploy this ad to. You will be able to choose between Facebook (Meta), Snapchat, and TikTok.
Note: You will only be able to choose a channel that the client is onboarded to, or if the media you’ve uploaded in the Ad Builder is supported by that channel. If you get a “Missing Dependencies” error, click the “Complete” link to resolve it.
From this step, you can edit Campaign Name as well as change the Special Ads Category.
What’s a Special Ads Category?
Special Ad Categories include ads around Housing, Employment, and Credit. Examples of these are ads referring to loan services, employment ads, housing repair services, or sale and rental opportunities. A popular use case is automotive dealer clients, who are required to use Facebook’s Special Ad Category due to leasing and financing options on their website.
Customize Your Ad
Add the destination Landing Page URL(s) for each channel. If you created your ad in the Ad Builder, the fields will already auto-populate from what you previously entered.
Note: If you select Advanced Edit, this will open up the Ad Builder where you can dive deeper into fine-tuning specifics of the Ad.
When using Advanced Edit, any changes that are made to the Ad(s) will be automatically updated to the Ad(s) that are being deployed. These updates will not update the base Ad(s), they will just modify for the current deployment.
Where Do You Want To Deploy This Creative?
Determine the existing campaign that you would like to use.
At the Campaign level, use the dropdown fields to select the existing campaign you wish the current ad to deploy to.
The Ad Set dropdown will automatically populate with existing Ad Sets under the Campaign you selected. Now select the existing Ad Set you wish to deploy the ad under.
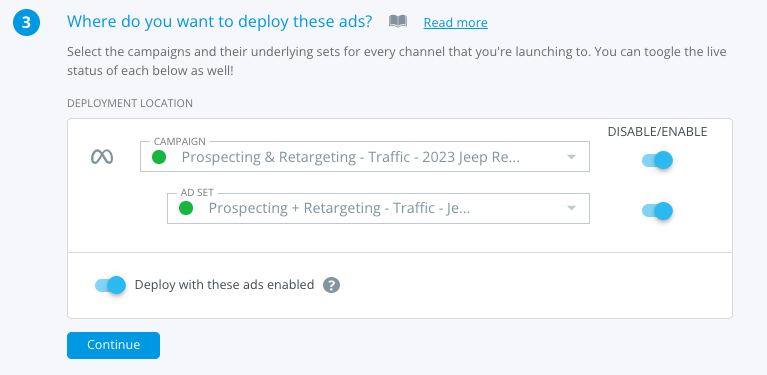
Click “Continue” and review your selections.
Are You Ready To Deploy?
Please confirm that everything you created looks correct and click Deploy once you’re ready.
The "Deploy with these ads enabled" toggle controls whether each Campaign, Ad Set & Ads should be deployed as Enabled (on) or Disabled (off).
When Enabled, the Campaigns will begin spending across the selected platform once all Ads are approved and the Ad Accounts have a valid payment method.
After deployment, you can change the status under Campaign Management.
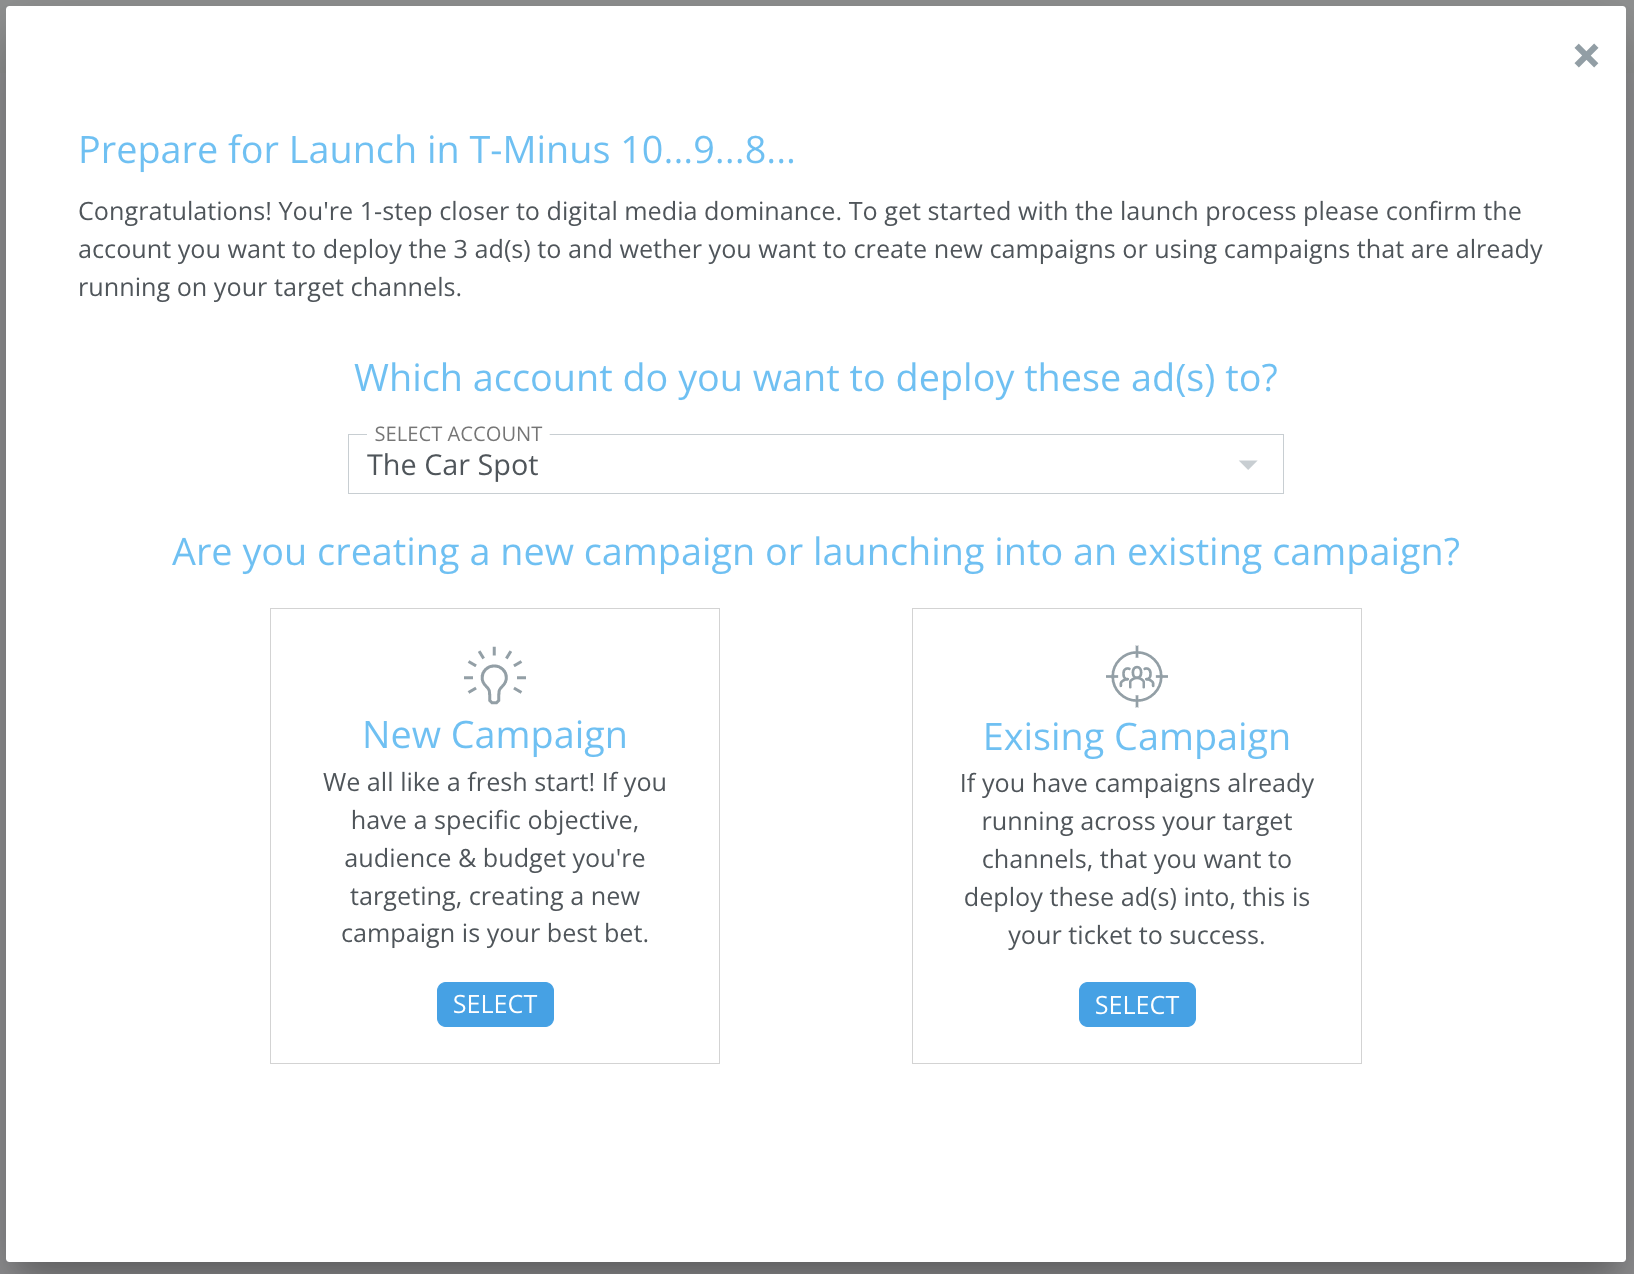
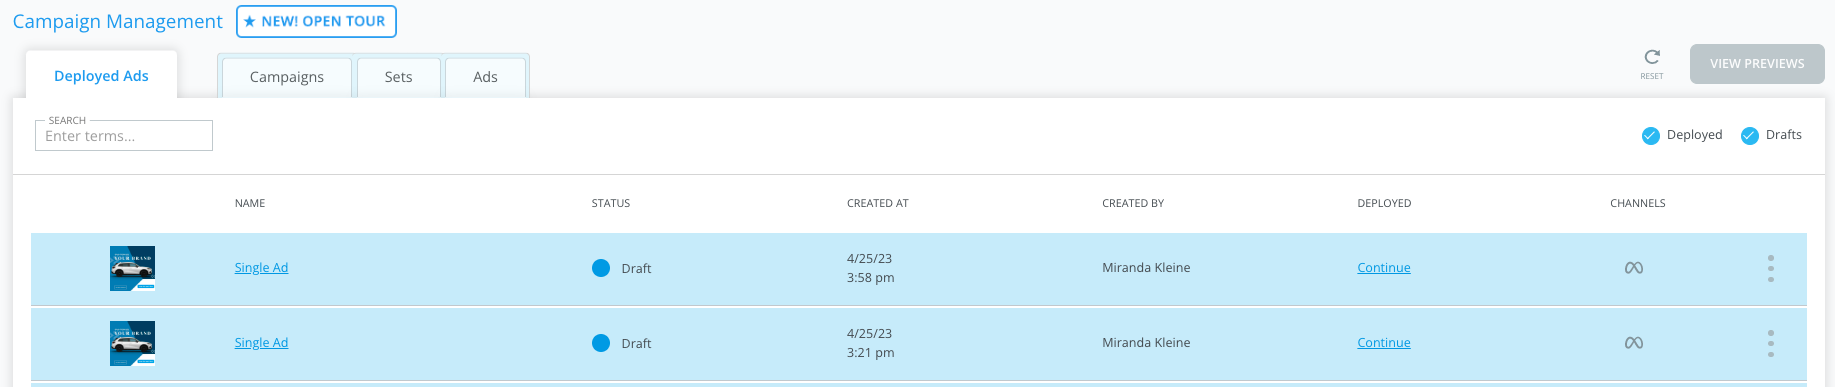
After you deployed the Ad(s) from either of the Deployment flows, you will immediately be taken to the new Deployed Ads tab in Campaign Management, where you will see your ad campaigns being built. This may take several minutes.
If there are any issues or you have questions during any of the Ad Launcher flows, do not hesitate to contact support by emailing: support@buyerbridge.com.