Before being able to onboard your client to Pinterest in BuyerBridge, you and your client will need to first create Pinterest Business Centers/Pinterest Ad Accounts.
In this article, we will walk you through:
- Pinterest Business Center creation for your organization and clients
- Ad Account setup (which includes partner access requests and adding employees)
- Pixel Creation
- Catalog Creation
- BuyerBridge Onboarding & Connecting Assets
👀 Watch the video walkthrough below and follow along with our guide:
Step 1: Pinterest Business Center Setup (Video Timestamp: 00:27)
How To Set Up Your Organization's Pinterest Business Center
Let’s start by setting up a Pinterest Business Center for your organization if you do not already have one. This is the account for your company, not your client account.
If you already have a Pinterest Business Center for your organization, you do not need to create a new one. Simply sign in and continue to setting up the Pinterest Business Center for your clients.
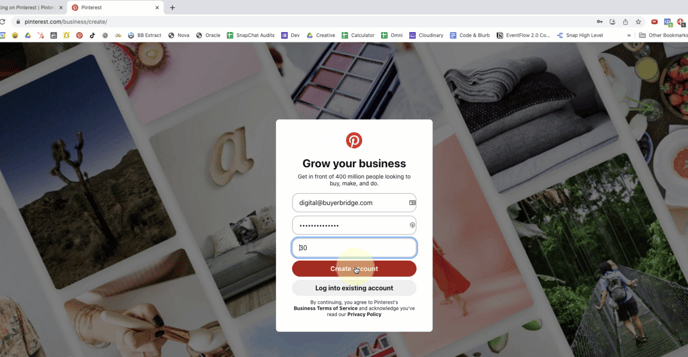
- First, visit business.pinterest.com. Log in to an existing Pinterest account or Sign Up if an account is not currently active.
For the purpose of this guide, we will be taking you through the process of Signing Up for a new Pinterest Business Center account.
- Click “Sign Up” at the top right of the screen > enter the information being asked for > click “Create Account”
- Now, to “Build Your Profile,” enter the following:
- Organization Name
- Organization Website
- Country
- Language
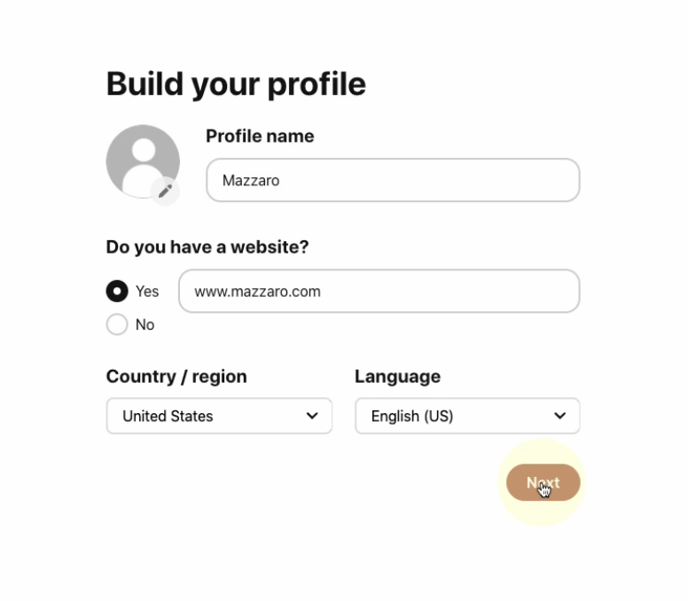
- Once completed, select NEXT. Then, “Describe Your Business"
- “What’s the focus of your brand?” Choose OTHER > Select the industry(s) based on your clients. For example, if you are a business that works with Dealerships you will enter in Automotive.
- “What are your goals?” Select up to 3. We choose: 1) Sell more products, 2) Generate more leads to your business, 3) Drive traffic to your site.

👀 NOTE: You can update your goals later in SETTINGS if you would like to change them.
- Select NEXT > Other > NEXT. There will be a pop-up question, click “Yes I’m interested in advertising” > on the next screen, click SKIP.
Once you have successfully completed these steps you have officially created your Pinterest Business Center for your organization! 🎉
Now it’s time for you to set up your client's Pinterest Business Center account.
How To Set Up Your Client's Pinterest Business Center Account
Setting up your client's Pinterest Business Center account is very similar to the above setup if they do not already have one.
If your client already has a Pinterest Business Center, you do not need to create a new one. Simply sign in and continue to Step 2: Pinterest Ad Account Setup.
- First, visit business.pinterest.com. Log into your Client's existing Pinterest account or Sign Up if an account is not currently active for your client.
For the purpose of this guide, we will be taking you through the process of Signing Up for a new Pinterest Business Center account.
- Click “Sign Up” at the top right of the screen > enter the information required > click “Create Account”
- Now “Build Your Profile" for your client:
- Client Business Name
- Client Website
- Country
- Language
- Once completed, select NEXT. Then, “Describe Your Business” for your client:
- “What’s the focus of your brand?" Choose OTHER > Select your client's industry.
- “What are your goals?” Select up to 3. We choose: 1) Sell more products, 2) Generate more leads to your business, 3) Drive traffic to your site.
👀 NOTE: You can update goals later in SETTINGS if you would like to change them.
Select NEXT > "Consumer Goods" > NEXT.
There will be a pop-up question, click “Yes I’m interested in advertising” > on the next screen, click SKIP.
If you and your client both have successfully created Pinterest Business accounts, you can begin the first step of Onboarding - which is setting up the Pinterest Connection User in BuyerBridge. Find out how Omnichannel authentication works in this article here: “[Omnichannel Onboarding] Omnichannel Authentication: Connection User”
NOTE: Our team is working on the backend to ensure the future state of the platform supports the connection of assets for Pinterest. When you go to set up your Pinterest Connection User in BuyerBridge you will be required to fill out a form - from which point, your Partner Experience Manager will take care of setting up the Ad Account, Pixel, Catalog, and next steps.
Step 2: Pinterest Ad Account Setup (Video Timestamp: 04:04)
How Your Client Will Create Their Pinterest Ad Account
After your organization + client have both created a Pinterest Business Center, your client will need to create a Pinterest Ad Account if they do not already have one.
If your client already has a Pinterest Ad Account, you do not need to create a new one.
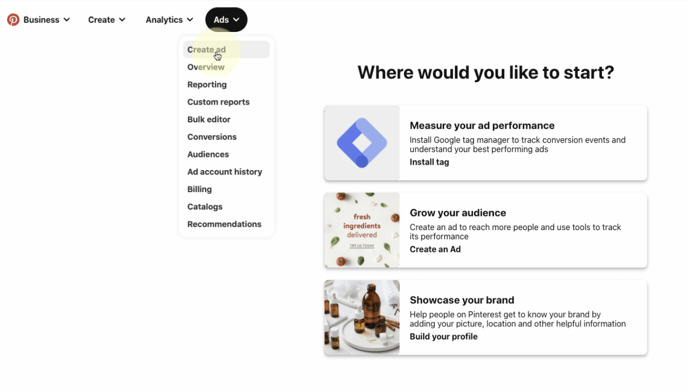
- From the client’s Pinterest Business Center account, navigate to the top left and select Ads > CREATE AD > NEXT > ACCEPT the advertising agreement.
Now your organization will need to be invited to your client's Business Center as a Partner.
How to Become a “Partner” of Your Client’s Pinterest Ad Account
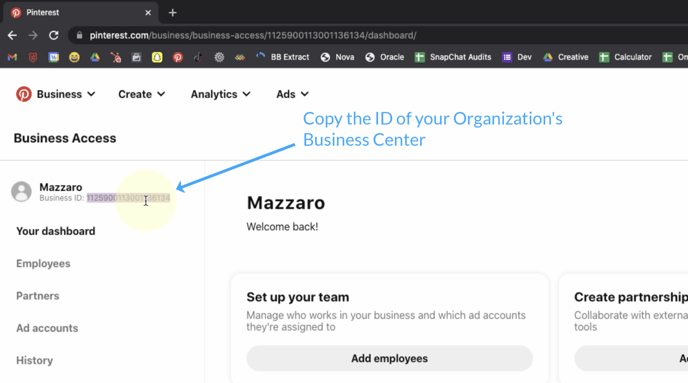
You will need to provide your client with your organization's Business ID, which will be located in the upper left of your organization's Pinterest account, under your organization's name.
When you have provided your client with their Pinterest Business ID, from the client's Pinterest account:
- Go to the upper right corner of their account and click the dropdown arrow > select BUSINESS ACCESS > Partners > Invite Partner > enter the Business ID of your organization
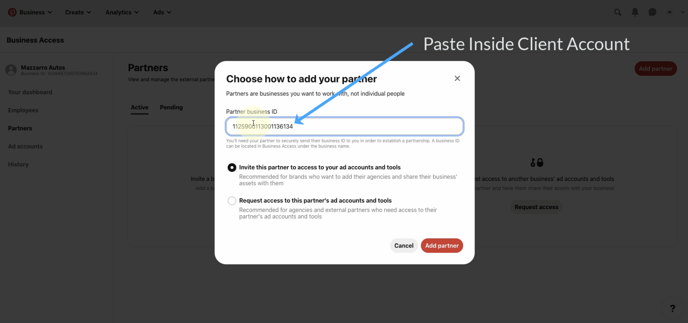
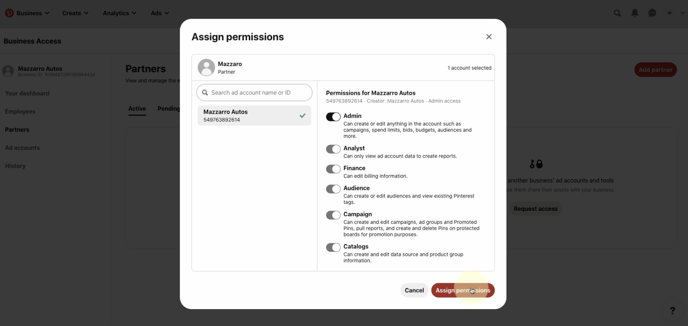
- Next, your client will click ADD PARTNER > ASSIGN ASSETS > grant ADMIN access > select ASSIGN PERMISSIONS
How Your Organization Will Accept Your Client's "Partner Request"
To see what accounts your organization has been granted access to, select PARTNERS.- Under “ACTIVE” will be the current active accounts
- Under “PENDING” will be the Pending Requests
- To accept pending requests, click REVIEW > ACCEPT
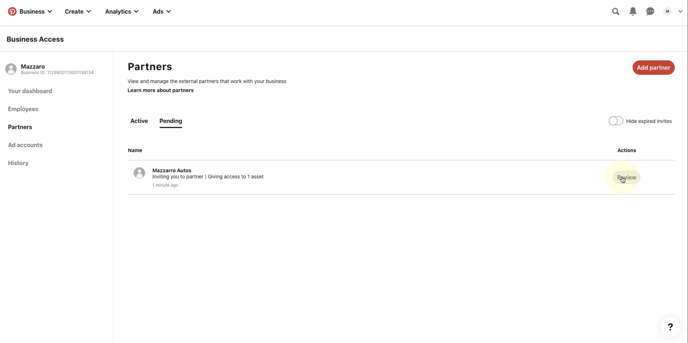
Once you have accepted your client’s request, any pending requests should now be displayed as active, and your organization will be granted admin permissions!
How Your Organization Will Add Employee Users + Your Partner Experience Manager(s)
- From the drop-down arrow in the top right corner, select Business Access > EMPLOYEES > ADD EMPLOYEES > choose the MANAGER role
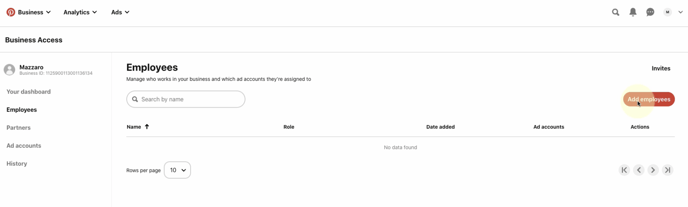
- Enter the employee’s email who’s being added > click ADD EMPLOYEES
- You can now assign assets > grant the user the access level you wish > select ASSIGN PERMISSIONS
🚨 IMPORTANT: You MUST add digital@buyerbridge.io as an ADMIN to ensure your Partner Experience Manager and BuyerBridge support is able to access what they need to complete your ad setup.
- Once that step is completed, users will need to go to their email or Pinterest Business Center and accept the invitation.
How To Add A Payment Method
- To enter a payment method for an ad account, navigate to the "Ads" drop-down > select "Billing" > fill out the Business Information
-png-1.png)
- Under "Are you an agency?" > select "No" > enter Billing Address (or select "Copy Business Information" if it is the same as the address listed
- Fill out the Card Number, Expiration Date, and CVC > hit "Save"
-png-1.png)
Step 3: Pixel Creation
Now let’s create your Pinterest Tag.
Start by going to your Pinterest Business Center (pinterest.com/business/hub) > select Ads in the top navigation > then from the drop-down click Conversions. 
On the Conversions page, click Tag Manager > hit the red Get Started button > the Tag ID is now generated and can be located in the top right corner.
Step 4: Catalog Creation
For new clients activating Pinterest with BuyerBridge, the Automotive catalog needs to be whitelisted in order to use. Whitelisting is completed directly by the Pinterest team and must be submitted through the following process:
- New activations need to submit account information via the new Pinterest Activation Form to begin the whitelisting process. Please submit by 12pm EST on Fridays and Tuesdays.
NOTE: Accounts who only require ODC audiences will only fill out the first page (leaving the last two catalogs-related questions blank) whereas Accounts who require full onboarding including catalogs upload will fill out the entire form.
- Pinterest will take over the next onboarding items including:
- ODC audiences
- Catalog approvals
- Website claiming
- Catalog uploads (when applicable).
Expected turnaround time is 3-4 business days from the Tuesday/Friday submission windows. Note: ODC audiences can take up to 9 business days.
Tip For Filling Out The Pinterest Activation Form: The Ad Account Id URL can be accessed from the Account Details Page in Business Access.
To get here go to Business Access > click Ad accounts > select the Account > the Ad Account Id will be under the account name
You will then want to copy the URL and paste it into the form.
-png-1.png?width=668&height=235&name=Untitled%20design%20(30)-png-1.png)
IMPORTANT: The Catalogs feed must be uploaded to your account prior to submitting this form. Please ensure that the feed includes new vehicles only (used/CPO vehicles are currently NOT supported) and that the feed is free of credit-related language in order to be HEC compliant (Housing, Employment, Credit).
Step 5: BuyerBridge Onboarding & Connecting Assets
Following the creation of the above Pinterest assets, it's time to start Onboarding and Connecting Assets through BuyerBridge.
If you have not already done so, you will first need to Authenticate the Pinterest Connection User:
- Using the BuyerBridge navigation menu, under Reseller > select Settings
- Locate the Snapchat "card" on the screen > click Update Pinterest Connection User
- The "Change Connection User" panel will slide out, click Continue Changing Pinterest Connection User > Authenticate With Pinterest > Log in with the Pinterest account
Get more details on how to authenticate the Connection User here.
After the Connection User is complete, you will begin the Onboarding steps.
Account Setup
Inventory Type
- Choose how you would like your Inventory retrieved > hit Continue.
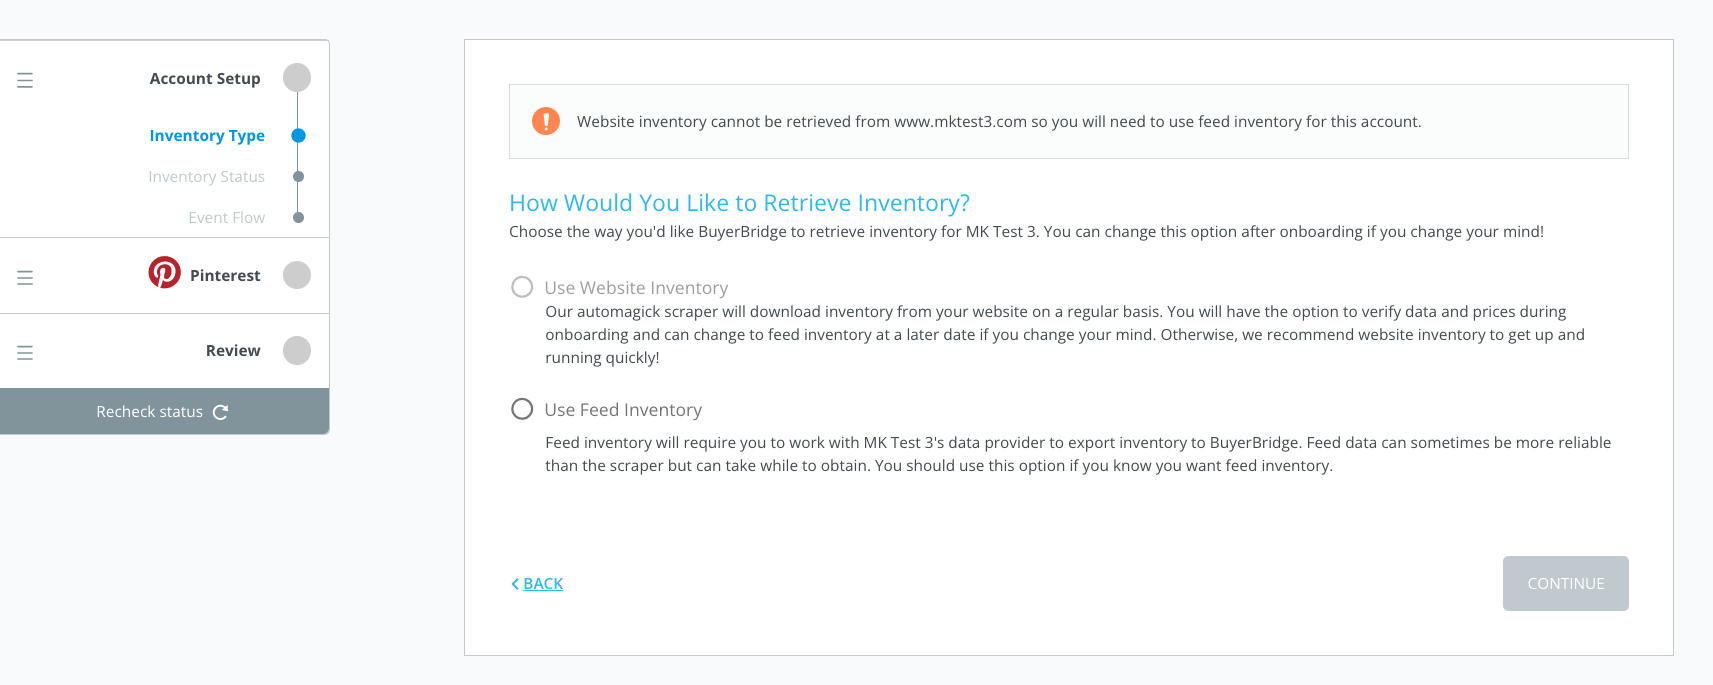
We recommend Use Feed Inventory for best results.
Feed Inventory
- Select the Feed Provider that you want to use from the drop-down > hit Continue.
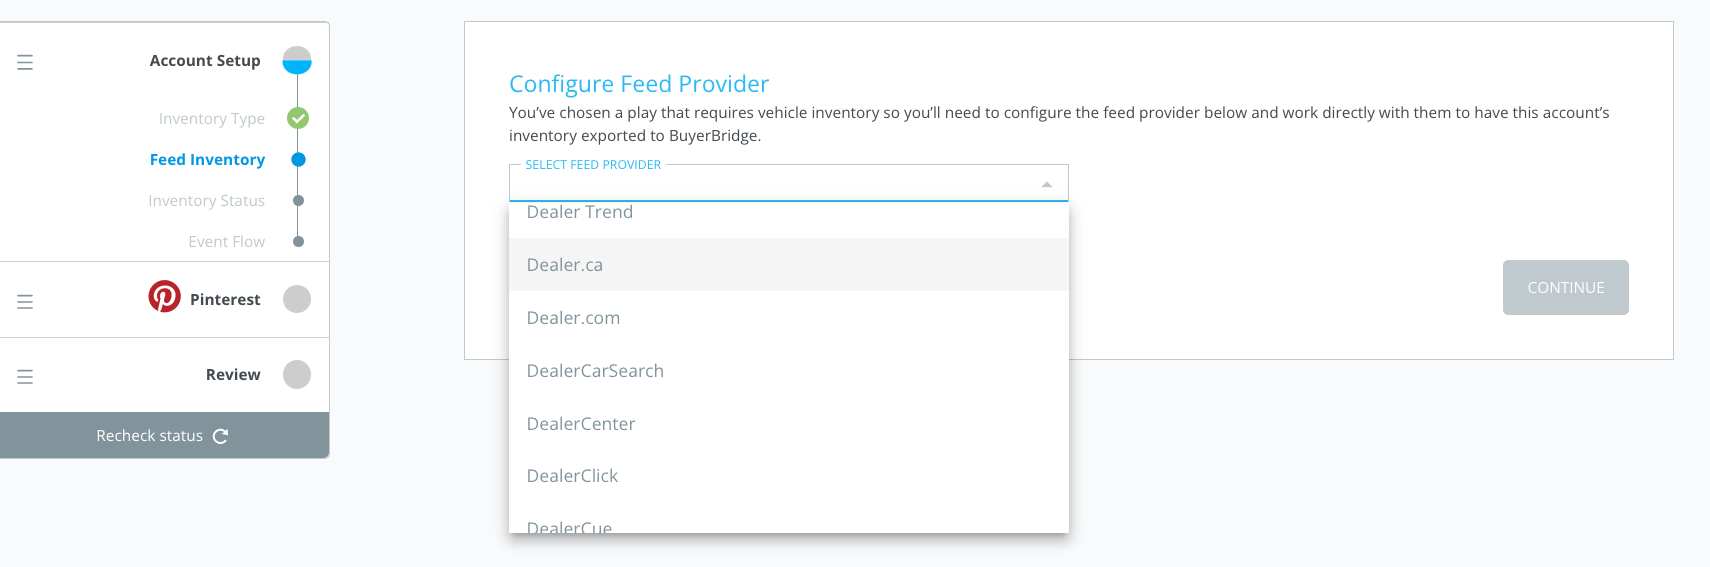
- Choose if you have the provider ID or if an email needs to be sent to the provider in order to receive the ID > hit Continue.
Inventory Status
- During this step you will be shown the status of your inventory connect and any alerts associated with getting this completed.
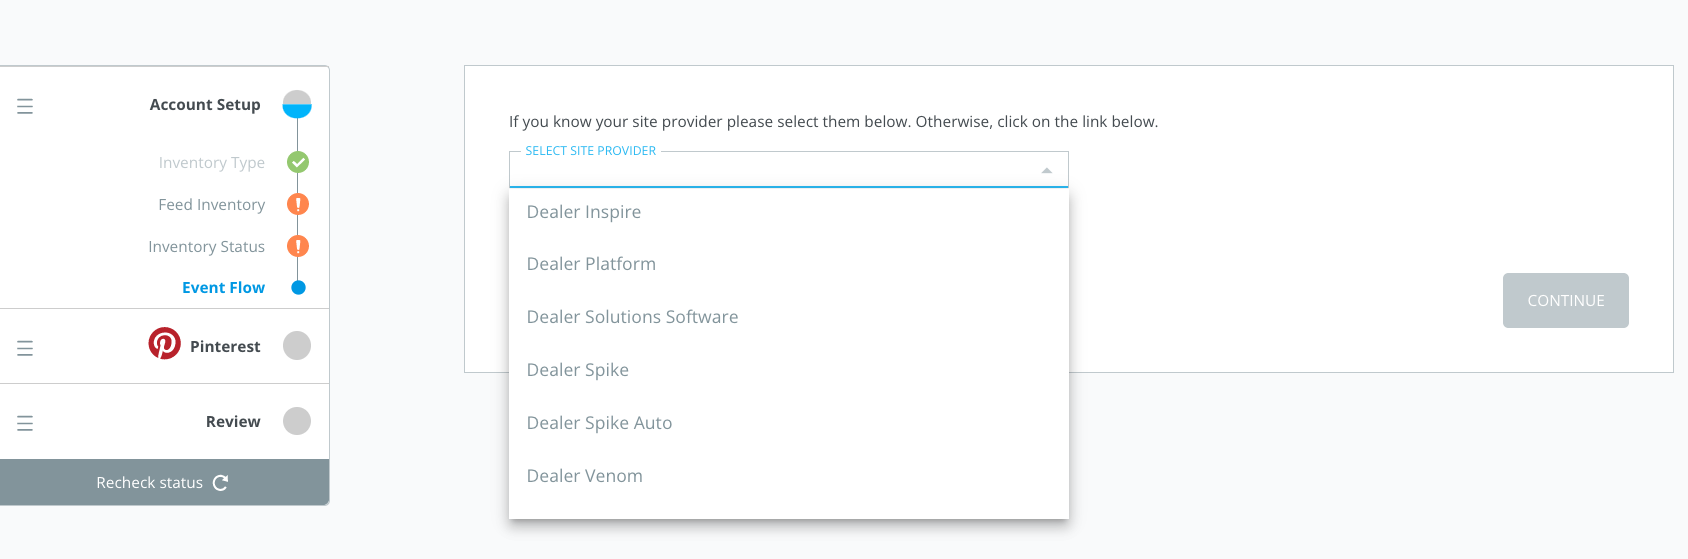
Event Flow
- Choose Site Provider > click View & Send Emails and follow the steps > once emails have been sent hit Continue.
Connect Assets
Looking good! To complete the Pinterest onboarding, you'll need to connect the following assets from your Pinterest account.
This requires that you have each set up correctly, if you are unsure please re-review the steps above before moving forward.
-png-1.png)
- To Connect Assets, click the drop-downs to choose the Ad Account, Pixel, and Catalog you would like to use
- After all of the assets have been connected, select Continue to reach the review process.
TIP: If you do not see your asset in the drop-down, hit the refresh icon on the right side to tell our platform to re-pull information from Pinterest.
See this alert on the Catalog selection?

You will not be able to connect your Pinterest catalog until Pinterest whitelists your catalog. If you already filled out the form, you may need to wait up to 72 hours for this to be complete.
Once the whitelisting is complete you will be able to select the Catalog ID in the drop-down.
Review
You will need to review all steps and information, if everything looks accurate > click Complete Onboarding.
If you're onboarding a BRAND-NEW client to Pinterest:
- Check out our "Getting Started with Omnichannel Onboarding" article for a step-by-step guide on how to get your new client set up and onboarded to Pinterest.
As you navigate through the Pinterest Business Center creation process for you or your clients and still have questions you can reach out to your Partner Experience Manager or contact BuyerBridge Support via email: support@buyerbridge.com.