When your clients trust you to run their social media ads, they do so with the expectation of a return on their advertising investment…and oftentimes, that means their ads need to be generating leads.
Leads play a huge role in the potential ROAI of your client’s ads…but ONLY if the lead's information is captured and delivered to a secure destination that your client can access.
And that’s why ensuring that a Lead Destination is set up and working properly for your clients is the MOST important part.
We’re here to help you make sure that your clients don’t miss out on sale opportunities by walking you through setting up your client’s Lead Destination and confirming that your client’s lead integrations are successful.
Setting Up Your Client’s Lead Destination During Onboarding
As your organization is onboarding a new client account to BuyerBridge, you will have the opportunity to set up a Lead Destination.
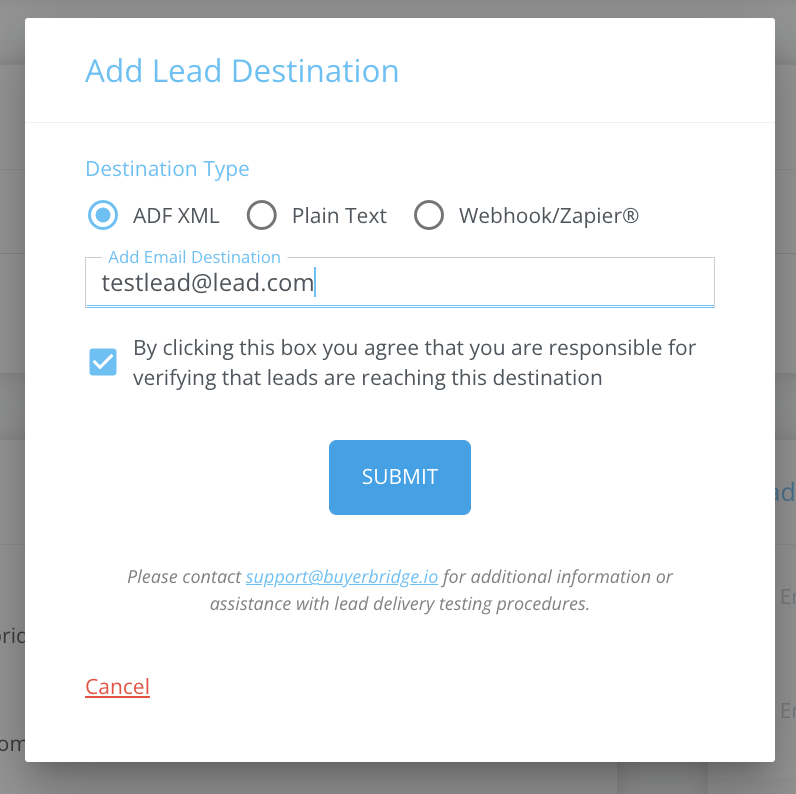
When you reach the Lead Destinations step, click Add Lead Destination and follow the instructions.
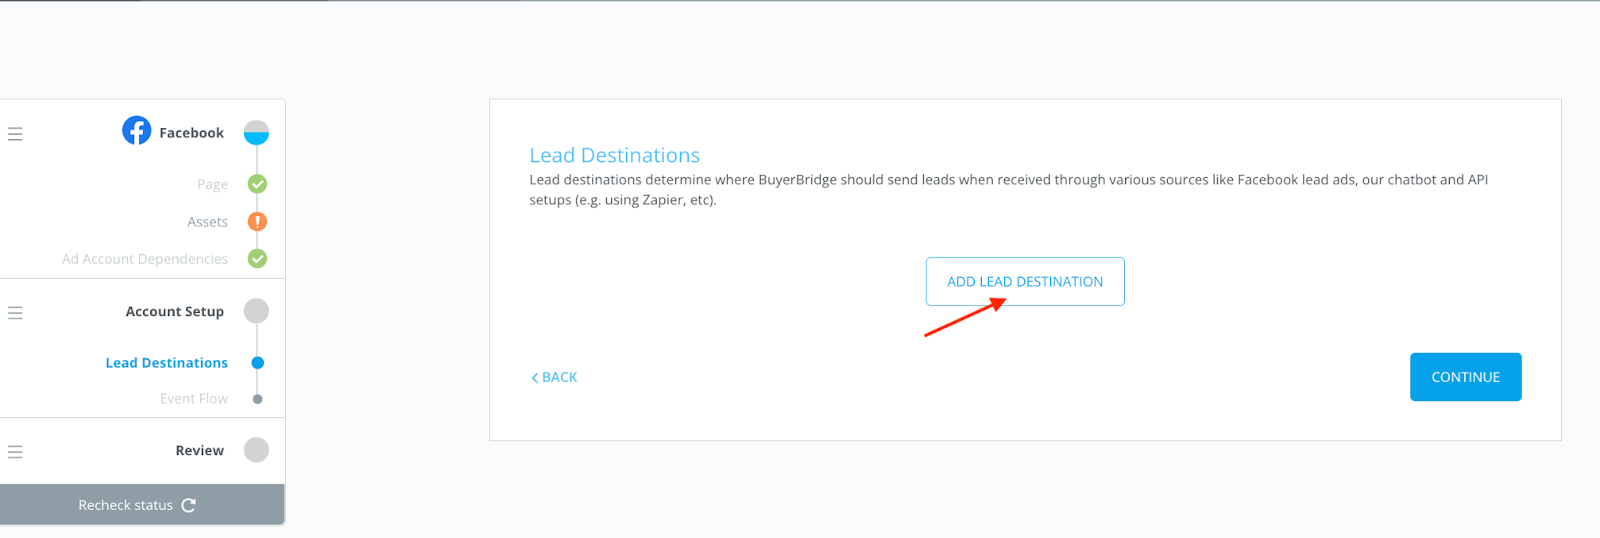
Important: You can select “continue” and move forward with onboarding without entering in a Lead Destination…
However, if you do not manually add a lead destination immediately after you finish onboarding, any leads your clients receive will not be integrated with BuyerBridge and will not be sent to the CRM. So you need to make sure that if you choose this method you add a Lead Destination after.
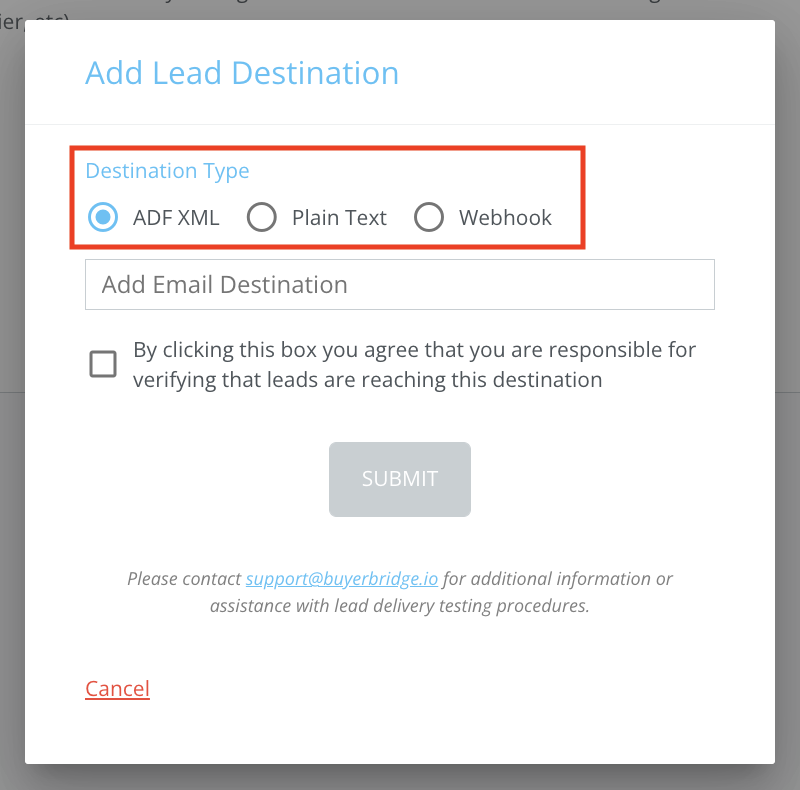
Next, you will be required to select the Lead Destination Type - AKA the type of destination where you will be sending your client’s Leads.
Types Of Lead Destinations
The BuyerBridge dashboard supports the integration of multiple types of Lead Destination formats: ADF/XML, Plain Text, and Webhook.
ADF/XML Lead Destination (Auto-Lead Data Format XML)
This format is an open XML-based standard that is specifically used for the Automotive industry.
To integrate this format, you will enter the email address provided by the CRM so that leads can be automatically sent to the CRM.
When an ADF/XML leads are received they should look like this:
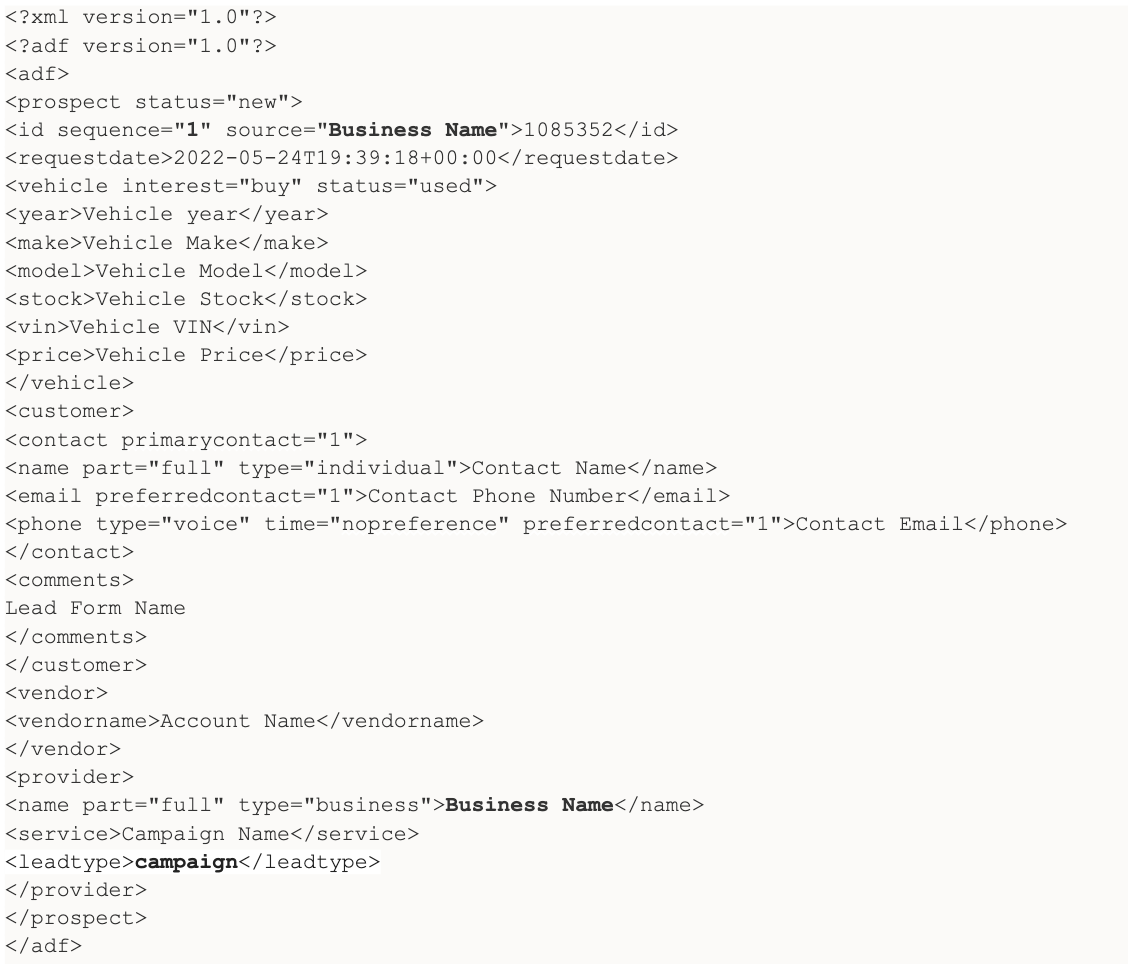
Note: The bolded items in the image above can be modified through the BuyerBridge dashboard to set default values.
Aspects of ADF-XML leads can be modified from the BuyerBridge dashboard:
- Certain fields in the ADF/XML leads can be changed via the Manage button on the Lead Destination card
- XML Provider Name
- Automatically defaults to the Organization Name and Campaign Name
- XML ID Sequence
- Automatically defaults to 1
- XML ID Source
- Automatically defaults to Organization Name
- Override Lead Type
- Can make all leads be either Internet, Phone, Campaign, or Showroom
Plain Text Lead Destination
When a Plain Text Lead Destination is selected,you are opting to have an email sent from BuyerBridge to your client’s CRM with their lead information.
Note: The email that the lead is sent to will be the one that was provided in onboarding.
You can use a personal email, work email, or the email that was provided by the CRM for this type of lead destination.
But keep in mind that if you choose to use the CRM email then the lead will be automatically added to the CRM.
For this format, you have the ability to customize the From Address and From Name.
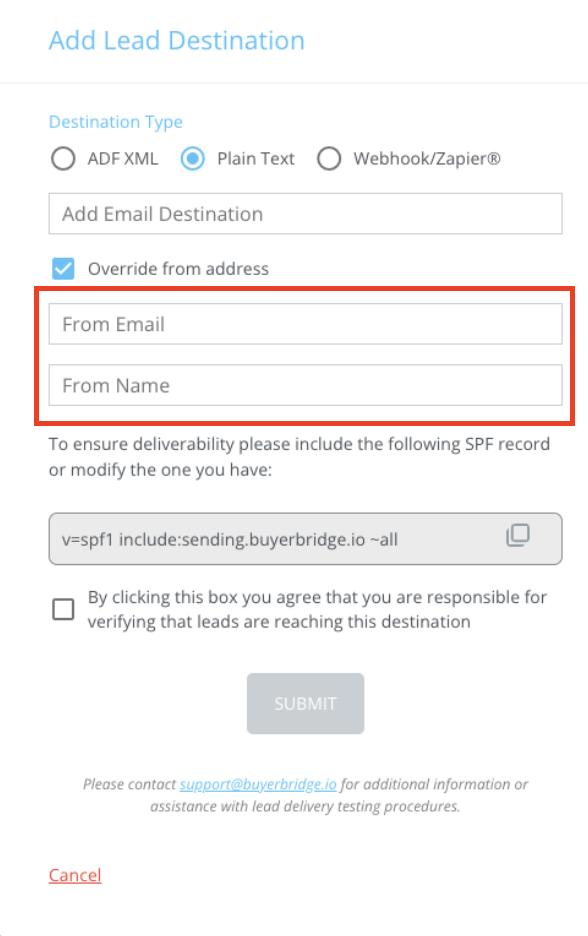
Example: If you do not want the email to say from “BuyerBridge,” you can change the “From Email” to display the specific email address configured in the BuyerBridge dash.
Too configure this: from the Account Settings page,under Lead Destinations > Select the Manage icon and follow the instructions.
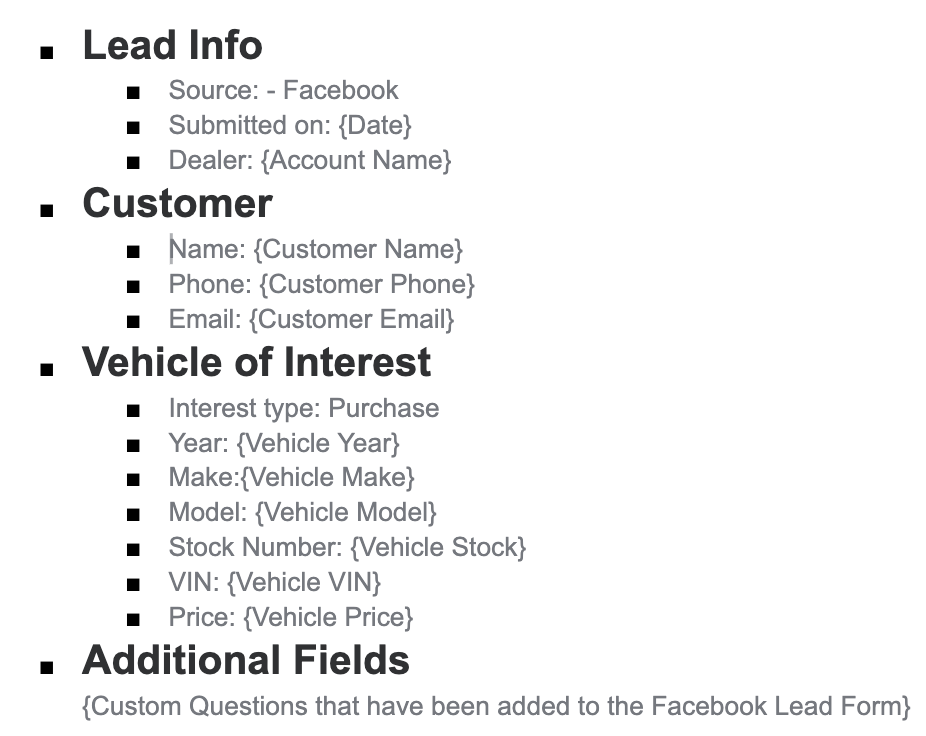
Plain Text Lead email will be sent in the following format:
Webhook Lead Destinations (Such As Zapier, LeadsBridge, Etc)
When a lead is identified in BuyerBridge and a Webhook Destination has been assigned, the lead information will be sent directly to the Webhook Destination.
You can easily configure the Webhook to be integrated with your client’s CRM so that their leads will then be sent directly to their CRM.
The Webhook lead will deliver the following data:
- Customer Name
- Customer Phone
- Customer Email
- Vehicle data (If present)
- Lead creating time
- Account for the Lead
- Lead Platform
- Appointment Time and Date (If present)
- Provider Name
- Provider Service
- Additional Fields (If custom questions have been added to the Lead Form)
Testing Your Lead Integration With BuyerBridge
Whether you’re adding a new Lead Destination during onboarding or after onboarding through the Account Settings page, it is critical to double-check that the integration is working properly.
Test your integration directly from the ad account by submitting a "Test Lead" via an Ad Preview.
Here is a step-by-step walkthrough on How To Submit A "Test Lead" For Facebook.
OR You can also test your integration from inside of the BuyerBridge app, under Leads > Click Create Lead > Manually enter in a test lead information > select the Create Lead button.
Note: For a more in-depth step-by-step guide click here!
Once you have submitted the test lead, you will need to check your CRM to see if the lead has made its way there and confirm that it contains the correct fields present.
Pro Tip: When testing an integration, be mindful of the following:
- If your CRM has any overrides in place for Lead fields, it could be overwriting the data that BuyerBridge sends
- You will want to confirm that your Provider Lead Type is correct when sending leads to your CRM
- Ensure that the service name is set to the name of the Campaign so you can get credit for the leads that you are providing to your accounts
- Check to see if your CRM has First In or Last In attribution set up as this may impact the leads being shown as coming from BuyerBridge as the source
- If your CRM has First In attribution set up and they called the Dealership and were entered into your CRM prior to providing any lead data via an advertising platform lead form, you may not get credit
- If no vehicle details are provided in the Lead it means they did not come from a lead destination source that included vehicle data
How To Add A Lead Destination After Onboarding
If you need to add a Lead Destination once you have completed Onboarding, locate Account Settings from the left navigation menu and scroll down to the “Lead Destinations” section at the bottom of the page.
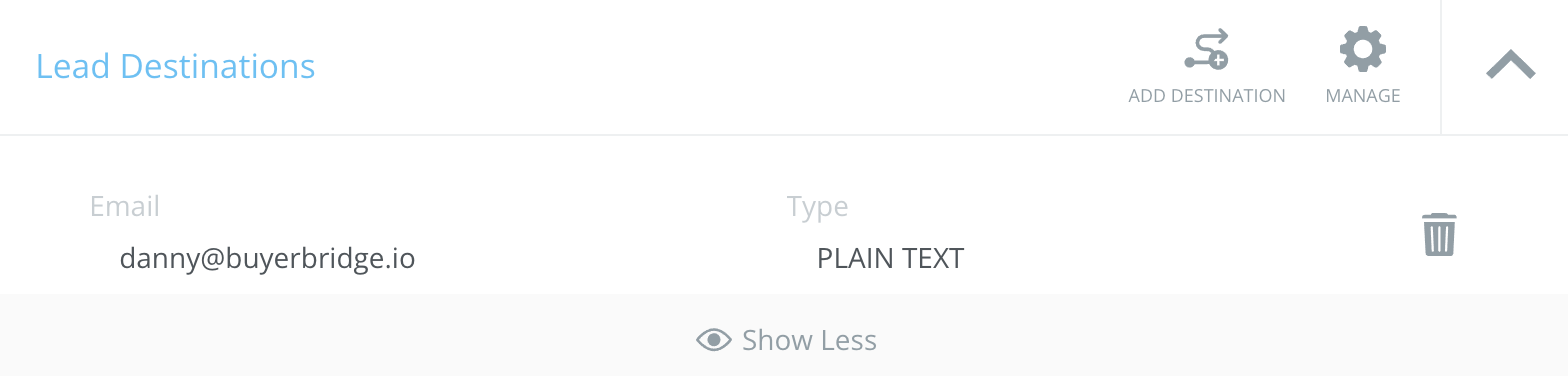
From this section of the Account Settings page, users will be able to view existing Lead Destinations, delete destinations that you no longer want to include, or Add Destinations.
Select Add Destination > choose Destination Type > enter Lead Destination > click Submit.
If you go through the process of adding, managing, or deleting a Lead Destination and need further assistance, reach out to your Partner Experience Manager or contact BuyerBridge Support via email at support@buyerbridge.com.